5 Tips For Simple Furniture Painting

Sometimes we tackle projects because we want to test out a new idea, or spend some time doing something we enjoy, but we don’t necessarily expect them to be easy or quick. Other times we know a project will make a big impact in our home but we don’t want to have all the fuss that goes with it, so we put it off.

One of my friends, Jake, has two dressers that didn’t go with the rest of the pieces he owns, so last spring we began throwing around ideas on how to refinish them. The project kept getting put off because we’re both busy people, and we had to be creative in figuring out a decent workspace.

Now Jake is moving to Chicago in less than a month, so I knew we needed to get our act together and get this project done. I wanted him to be able to have furniture he loves to take with him to a new place and have a fresh start.

While doing this project, I was conscious about the things that make a project less daunting, and these are the 5 tips I wanted to share with you!

1. Listen to Your Piece

This first tip I think really applies to houses, but can also apply to furniture as well. In a house, we take clues from the architecture to guide us to different design choices. I think in some ways furniture does the same thing. Maybe this is me justifying laziness, but after a while it becomes clear how I want to refinish a piece. Whether it’s paint, stain, fun details, or new hardware.

This time I didn’t have the furniture in my house to stare at nonstop so it was a little trickier. Jake didn’t really know what his style was, or more accurately how to explain it. To find the best fit, I took cues from the other objects he has in his apartment. He likes clean lines, silver metals, and doesn’t mind dark colors. Overall, he’s drawn to a crisp look with some texture thrown in here and there.

5 Tips For Simple Furniture Painting 5 Tips For Simple Furniture Painting
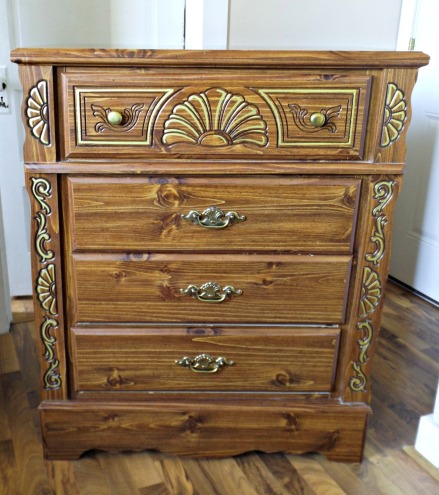
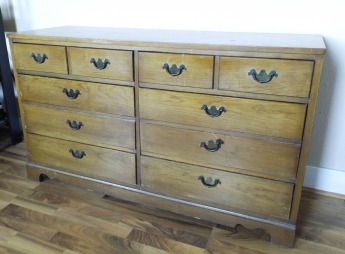
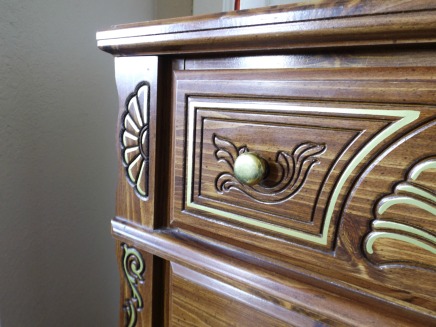
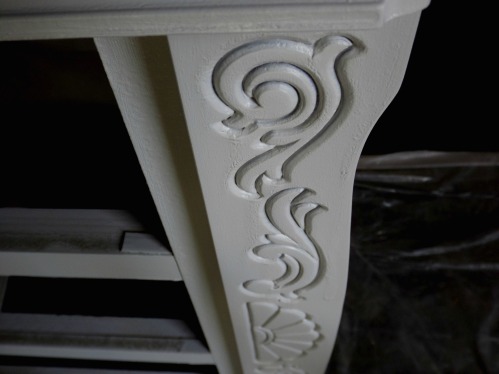
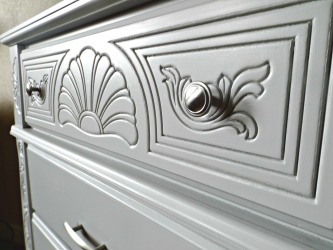
As you can see, both dressers have outdated hardware that doesn’t go along with Jake’s aesthetic. One of the first things we decided was to replace the hardware with matching hardware for both dressers.

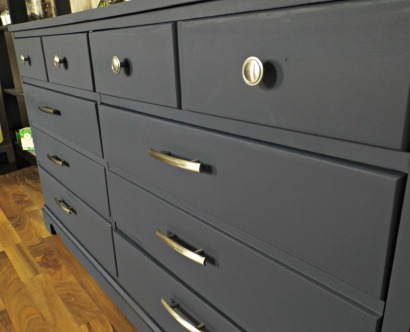
The dressers don’t have anywhere close to the same style so I thought it made the most sense to paint them different colors. I knew I wanted to use General Finishes and Jake decided seagull gray milk paint for the tall dresser, and midnight blue chalk style paint for the long dresser.

2. Use Sprayer Without Paint

After sanding the tall dresser I kind of hit a wall of oh crap how are we going to get all the dust out of these details? And then I was like oh! Canned air. And then I was like OH. I can just use my sprayer without paint to do the same thing.

I’ve never heard of anyone else doing this so maybe it’s just too obvious to blog about, but it was definitely an aha moment for me.

5 Tips For Simple Furniture Painting

3. Paint Consistency and Spraying Technique

I didn’t have any issues with the long dresser, likely because that is the second one we painted. However, there were some flukes with the tall dresser painted with milk paint.

I have a HomeRight Finish Max HVLP sprayer and in the manual, it says to thin paint out so that it runs through the cup that comes with the sprayer in 25 to 40 seconds. When I timed it, my paint was running through closer to 25 seconds, but I was ending up with drip marks.

5 Tips For Simple Furniture Painting

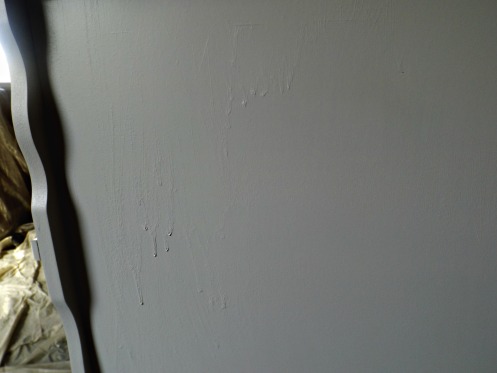
I didn’t troubleshoot all the possible issues, but I think it was because my paint seemed a little runny. It also could have been because I was applying too much paint at once and standing too close to the piece. These are some general rules I like to keep in mind when I’m spraying to avoid issues like this:

  • Make sure your paint is a good consistency
  • spray in even strokes, starting the spray away from the piece then moving across
  • Let go of the trigger after each spray to avoid moving too quickly and creating areas with too much paint
  • Don’t stand too close (or too far) from the piece. I generally stand about a foot or so away.

5 Tips For Simple Furniture Painting

4. Fixing Mistakes, Don’t Panic!

However, if you do mess up (like I did) don’t freak out! Whether it’s drip marks, accidentally touching the wet paint, or dirt in wet paint these are all fixable. In spots like the ledges of the drawer frames I wiped drips off because it wasn’t going to affect the finish. In spots like the side of the dresser, I just left them to sand (gently) before doing another coat. It would also be beneficial to just tap the drip with your finger so you don’t have as much to sand out.

One of us also bumped the bottom corner but I left it that way because I didn’t want to put too much paint on one area and end up with even more drips. I think it’s just easier to apply more paint than have to sand it off and then apply more paint.

I didn’t get any dirt in the piece this time but that is a super easy fix. Just wait until the paint dries and knock it out with a dry cloth. This shouldn’t mess with the finish at all.

5. Work with a Friend!

Typically I do projects on my own at my own leisure unless I am frustrated and need help. In this case, I felt there was more of a time crunch with the big move coming really soon. I didn’t want the project to take any longer than necessary so Jake could focus on packing and making the transition to Chicago.

That being said, it was so much faster to have an extra set of hands throughout the entire process. It’s also great because you have someone else to blame if things go wrong. Just kidding… sort of. If you’re looking for a project to go smoothly and take less time, definitely enlist help.

The project start to finish took a weekend and I wasn’t completely drained by the end. We bought supplies Friday night and worked from about noon to seven on both Saturday and Sunday. So really we put in about 14 hours, maybe less, since I didn’t really account for eating. Although I don’t think we really had any down time for paint and wood filler to dry.

So there you have it! 5 easy tips to make painting simpler and hopefully to help you gain some motivation instead of putting a project off. Now what you’ve probably been waiting for… before and after photos!


5 Tips For Simple Furniture Painting

5 Tips For Simple Furniture Painting

5 Tips For Simple Furniture Painting

5 Tips For Simple Furniture Painting
Have you ever tried any of these tips for painting furniture or have any other tips I didn’t mention? Let me know in the comments! 🙂

See You Around!

Lauren <3

5 Tips For Simple Furniture Painting

If you liked this post, you may also want to check out this post.

DIY Ceramic Tile Backsplash

Today is the day I share with you our brand new tile backsplash, and the steps it took to install it. Our kitchen is yet another step closer to being awesome, and it almost doesn’t visually suck anymore.

We were very lucky to get most of our materials free. Below are the list of materials you would need. The only things we had to buy are the items I indicated with a price. Clicking the material links will take you to sources of where to purchase/ where I did purchase the items.

Materials:

My Project Cost:  $37.50 (Accounting for selling the joint compound leftovers and not accounting for sales tax)

Project Value/Potential Cost: $251.53

NOW. The cost will vary depending on the type of materials you buy, and what tools you already own. I just wanted to see with the almost exact products I used, including their sizes, how much this project could have cost me.

If you missed my post of how I prepped my walls check that out here.

I mentioned I was going to explain how we filled in the hole in our backsplash wall, but I can’t really do that because Chris did it without me. Not complaining, but he didn’t take pictures and he didn’t really explain it to me very well. But, I’m assuming most people don’t have that issue and it’s mostly a case by case thing anyway.

DIY Ceramic Tile Backsplash

The next thing I did was lay out several tiles in my pattern on the counter. This way after we put the mastic on the wall we wouldn’t have to scramble to get tiles up, and it would help us engrave the pattern into our brain.

DIY Ceramic Tile Backsplash

DIY Ceramic Tile Backsplash

As we went along we used 1/8″ spacers in most places to keep everything even. In some places we didn’t use them because the tile cuts weren’t 100% even so it looked a little weird using a spacer, or the spacer wouldn’t stay put.

You can see in the picture above that we just tiled around the outlets. This is because we didn’t have the proper tools to make the types of cuts we needed. This can sometimes be avoided by laying out a pattern in a way that doesn’t have weird cuts.

We left all the spots around the outlets without tile, and took tiles to Chris’s brother’s house to have him cut them (since he had the right tools). Afterwards we then reapplied some mastic on the wall and to the tiles.

DIY Ceramic Tile Backsplash

Here is what the tile looked like from a distance once we put it all up.

Then we let it sit for longer than the recommended amount of time before we grouted. We definitely did not choose the best timing to decide to grout. It was around 11:00 PM when we started. We would’ve done it during the day but Chris had Little T over night and we had to wait until he went to bed. 2 year old boys are not very good at entertaining themselves when house work is going on.

Another problem we ran into was rock hard grout. We had to chisel away at the chunk to get usable grout which ended up having little chunky pieces even after we mixed it with water.

If we had started doing this during the day we would have said screw it and just went to buy a new bag of grout but we were tired, wanted to get it done, and it was so late so nowhere close was open. This made it a pain in the behind to apply, but overall didn’t really hinder the way the grout looked.

DIY Ceramic Tile Backsplash

Here’s the grout right after we applied it and before we wiped anything off. Do you like our light strategy? We had to be super quiet because our house only has one heat source and we couldn’t shut Little T’s door all the way because it would get too cold in his room. So instead of turning the kitchen light on and risking waking him up, we just used this and moved it around.

DIY Ceramic Tile Backsplash

This picture is after I wiped everything down with a damp cloth to clean the grout lines up, but not necessarily to get the tile perfectly clean (I have yet to do that).

DIY Ceramic Tile Backsplash

Here is a close up of an area that I got pretty clean.

I really liked the light look of the tile without the grout, and I was a little nervous about what the tile would look like with the dark grout. However, I really like the way it turned out! I think it goes quite nicely with the counter tops and the tile doesn’t stick out as being too modern.

DIY Ceramic Tile Backsplash

As a reminder that is what the kitchen looked like originally.

DIY Ceramic Tile Backsplash

This is what it looks like now. It’s a little discombobulated, but with some new flooring and painted white cabinets it will look prim and proper.

My main suggestion would be to make sure your materials aren’t going to cause you any headache. I’m all about reusing materials so they don’t go to waste but I think I much rather would have bought new grout. Cutting the tiles wasn’t a bad choice, but it was a little nerve wracking that everything wasn’t completely straight as this was my first time doing tile.

The most frustrating part was trying to find the right time to do the project, and I could have benefited from slightly better planning. Overall, I’m satisfied and this was a much needed update.

Have a good holiday, and see you around!

Lauren <3


Living Room Tour

I’m one of those people who likes to rearrange. Furniture, decor, organization, anything. When I get a new piece of furniture I rearrange to make it fit right in with everything else. When the seasons change I add different decorations. Sometimes I just get bored with the arrangement of a room, so I switch it up. My living room is probably the most versatile room to move around the furniture. After cleaning the carpets I figured it was time for a change in the living room.

Flip This Rental | Living Room Tour

Flip This Rental | Living Room Tour

Flip This Rental | Living Room Tour

Above is how the living room was set up beforehand. I liked the couch set up because it made a more social space for when we had company. We could comfortably chat with each other or watch television. On the other hand I felt like the set up made our living room feel much smaller than it actually is.

Flip This Rental | Living Room Tour

Here is a panorama of the new living room set up.

Flip This Rental | Living Room Tour

A closer up of the couch set up.

Flip This Rental | Living Room Tour

Here’s the fireplace and T.V. You will notice a T.V to the left and the wall mount behind the T.V. on the fireplace. The wall mount T.V. is waiting to be repaired, so the T.V. we are currently using is from the bedroom. I’d like to rearrange the fireplace once the T.V. is fixed so it looks more even. The left side looks really cluttered because of books and DVD’s, whereas on the right the PlayStation and internet router almost blend in.

Flip This Rental | Living Room Tour

For now I put my trunk table underneath this painting. I could put it on the other end of the couch as an end table, but for now I think putting it here shows off it’s charm a little more. When we decorated the living room I didn’t even realize it, but the colors in our throw pillows and blanket go perfectly with the blues and browns in the painting.

Flip This Rental | Living Room Tour

I have two of these penny vases that I DIY’d over on our movie cases. Typically I put them on the fireplace, but right now that space is taken up. I got two almost identical vases at goodwill, (they were the same shape just a different shade of green and one was slightly heavier) and I spray painted them black and hot glued pennies to them. Such an easy decor item and you can hardly tell they’re pennies from far away!

Flip This Rental | Living Room Tour

Another simple update to the living room was changing out the plain white rods and nasty curtains for nice oil rubbed bronze rods and long curtain panels. We left the original hardware and kept the old curtains so we can put them back when we move out.

Project Plans

Flip This Rental | Living Room Tour Flip This Rental | Living Room Tour

My goal for winter break is to repaint all the window trim. As you can tell in these photos the paint is peeling (just like the rest of the trim in the house was), and it is yellowy underneath. The biggest reason the window trim started majorly peeling was we used plastic over the windows throughout the winter to seal the heat in. When we pulled the plastic off in the spring the paint peeled with it. On the windows that the locks are broken we also have wood pieces to keep the windows “locked”. All the boards are plain wood and I want to paint them white so they blend in. The next best thing would be replacing all the locks, but that costs money.

I want to paint the ceiling trim too as I noticed it is quite nasty in comparison to the baseboard trim that I repainted (you can really notice it in the third picture from the top). I also need to go back and sand down some spackle spots that the boyfriend forgot to sand before we painted. There are also some spots that look a little streaky that we will go over again.

A few other small projects include cleaning the electrical outlet covers, sprucing up the fireplace mantle, and hiding the cable cord and internet routers.

Which set up did you like better: up close and social, or the wide open spaces?

See You Around!

Lauren <3

P.S. If you missed the bathroom tour – check it out here