Comparing the Cost of DIY Curtains and non-DIY Curtains

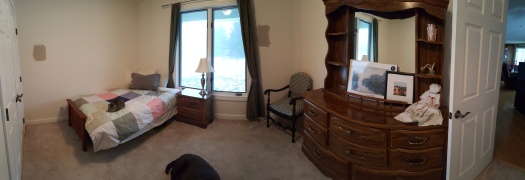
Easily the best feature of my new room is the insane amount of windows I have. On the other hand, having an insane amount of windows is not so great when you’re trying to sleep.

When I moved in, there were plastic blinds on half of the windows and the ones that were left looked like junk. My friend that lived here before me tacked blankets up to keep the light out. I knew I was going to go in a different direction and wanted something pretty. Something that would block out the light when I wanted and let light in when I wanted.

Comparing the Cost of DIY Curtains and non-DIY Curtains | Windows Before

As I’m sure you know, curtains are freaking expensive, especially when you have a bunch of really big windows. So, I made curtains out of sheets which was an idea I had seen from a few different bloggers on Pinterest. In this post I’ll show you the materials I used and their cost so you can weigh the pros/cons of doing a similar project.

My Window Dimensions

In my room I have 3 windows that are all 70 inches by 70 inches. Therefore, I needed 6 curtain panels that were at least 35 inches wide and 70 inches long. Obviously, these dimensions would cover the window but the length would not look great.

Ideally, curtains are hung at least 3 inches above the window. Personally, I like the curtains to touch the floor but not pool too much. To make sure I got sheets that were long enough, I measured from the top of the window to the floor and added three inches.

Curtain Materials

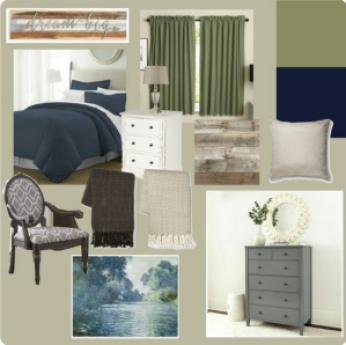
After searching around a little bit for different sheets I decided on the Mainstays 200 Thread Count Sheet in twin size. They had the best color option at the cheapest price so it was an easy decision. I used both a solid and patterned sheet to make the curtains thicker as well as reversible. I chose navy for the solid color and the blue diamond ikat pattern.

These sheets are $4.97 each and I needed 12  (6 patterned, 6 solid) for a total of $59.64. Each sheet is 66 inches wide by 96 inches long. In a different room I think one sheet would have been fine, but I wanted to block out a lot of light in my bedroom.

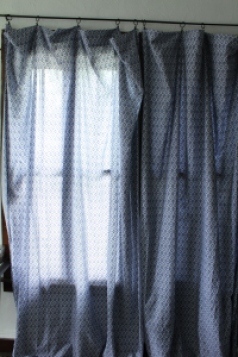
Below is an example of how much light 1 sheet (left) blocks versus 2 (right).

Comparing the Cost of DIY Curtains and non-DIY Curtains | 1 sheet versus 2

Cost of DIY Curtains (Fabric) and Pre-Made Curtains

I thought I was shelling out a decent amount of money for these curtains, so I was interested to see how much more I would have spent to buy fabric or just straight up buy curtains and achieve a similar look.

If I would have bought fabric from JoAnn’s:

  • Lining Fabric (54″ wide) – $3/yd (on sale) x 16 yds (to match 96″ length)= $48 (not on sale = $96)

  • Print Fabric (54″ wide) – $4.50/yd (on sale) x 16 yds = $72 (not on sale = $144)

The total price for just fabric would have been $120 on sale, $240 not on sale!

I found a pretty good deal at JCPenney on 50″ x 95″ back tab curtains for $13.99 each (clearance) times 6 panels for a total of $83.94. These aren’t that much more expensive, but the user reviews mention these curtains are not the best at blocking light.
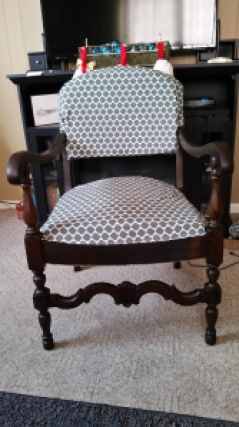
Curtain Hardware

In all honesty, I didn’t want to do a whole lot of work besides hanging the curtains up so I didn’t get all fancy and make back tabs or put in grommets or anything. Instead, I just bought clip rings in oil rubbed bronze. There are 7 rings in each package, each package costs $4.74 and I bought 5 packages for a total of $23.70. I ended up using 5 rings on each panel so I still had 5 left over.

Last but not least I got curtain rods from Home Depot, also in oil rubbed bronze, for $6.97 x 3 for a total of $20.91. They’re 48 – 84 inches long and 7/16 in. thick.  I was trying to get the cheapest option possible, but aesthetically I think a thicker curtain rod would be better.

Total Cost Breakdown

here is an overview of the items I bought and their costs:

  • 12 twin sheets x $4.97 each = $59.64
  • 5 packages of (7) curtain rings x $4.74 each = $23.70
  • 3 curtain rods x $6.97 each = $20.91

Bringing the total cost of curtains and hardware (without tax) to $104.25

Comparing the Cost of DIY Curtains and non-DIY Curtains | Curtain Pattern

I absolutely love the way these curtains turned out and I think they add a lot of style and function to the room (but hey, I may be a little biased). I know in my next apartment I won’t be using all of the panels but I think it was a great investment compared to buying pre-made curtains.

What do you think? Would you try sheet curtains, DIY curtains out of fabric, or just buy curtains? I would love to hear your pro/con list!

See You Around!

Lauren <3

Comparing the Cost of DIY Curtains and non-DIY Curtains

5 Tips For Simple Furniture Painting

Sometimes we tackle projects because we want to test out a new idea, or spend some time doing something we enjoy, but we don’t necessarily expect them to be easy or quick. Other times we know a project will make a big impact in our home but we don’t want to have all the fuss that goes with it, so we put it off.

One of my friends, Jake, has two dressers that didn’t go with the rest of the pieces he owns, so last spring we began throwing around ideas on how to refinish them. The project kept getting put off because we’re both busy people, and we had to be creative in figuring out a decent workspace.

Now Jake is moving to Chicago in less than a month, so I knew we needed to get our act together and get this project done. I wanted him to be able to have furniture he loves to take with him to a new place and have a fresh start.

While doing this project, I was conscious about the things that make a project less daunting, and these are the 5 tips I wanted to share with you!

1. Listen to Your Piece

This first tip I think really applies to houses, but can also apply to furniture as well. In a house, we take clues from the architecture to guide us to different design choices. I think in some ways furniture does the same thing. Maybe this is me justifying laziness, but after a while it becomes clear how I want to refinish a piece. Whether it’s paint, stain, fun details, or new hardware.

This time I didn’t have the furniture in my house to stare at nonstop so it was a little trickier. Jake didn’t really know what his style was, or more accurately how to explain it. To find the best fit, I took cues from the other objects he has in his apartment. He likes clean lines, silver metals, and doesn’t mind dark colors. Overall, he’s drawn to a crisp look with some texture thrown in here and there.

5 Tips For Simple Furniture Painting 5 Tips For Simple Furniture Painting
As you can see, both dressers have outdated hardware that doesn’t go along with Jake’s aesthetic. One of the first things we decided was to replace the hardware with matching hardware for both dressers.

The dressers don’t have anywhere close to the same style so I thought it made the most sense to paint them different colors. I knew I wanted to use General Finishes and Jake decided seagull gray milk paint for the tall dresser, and midnight blue chalk style paint for the long dresser.

2. Use Sprayer Without Paint

After sanding the tall dresser I kind of hit a wall of oh crap how are we going to get all the dust out of these details? And then I was like oh! Canned air. And then I was like OH. I can just use my sprayer without paint to do the same thing.

I’ve never heard of anyone else doing this so maybe it’s just too obvious to blog about, but it was definitely an aha moment for me.

5 Tips For Simple Furniture Painting

3. Paint Consistency and Spraying Technique

I didn’t have any issues with the long dresser, likely because that is the second one we painted. However, there were some flukes with the tall dresser painted with milk paint.

I have a HomeRight Finish Max HVLP sprayer and in the manual, it says to thin paint out so that it runs through the cup that comes with the sprayer in 25 to 40 seconds. When I timed it, my paint was running through closer to 25 seconds, but I was ending up with drip marks.

5 Tips For Simple Furniture Painting

I didn’t troubleshoot all the possible issues, but I think it was because my paint seemed a little runny. It also could have been because I was applying too much paint at once and standing too close to the piece. These are some general rules I like to keep in mind when I’m spraying to avoid issues like this:

  • Make sure your paint is a good consistency
  • spray in even strokes, starting the spray away from the piece then moving across
  • Let go of the trigger after each spray to avoid moving too quickly and creating areas with too much paint
  • Don’t stand too close (or too far) from the piece. I generally stand about a foot or so away.

5 Tips For Simple Furniture Painting

4. Fixing Mistakes, Don’t Panic!

However, if you do mess up (like I did) don’t freak out! Whether it’s drip marks, accidentally touching the wet paint, or dirt in wet paint these are all fixable. In spots like the ledges of the drawer frames I wiped drips off because it wasn’t going to affect the finish. In spots like the side of the dresser, I just left them to sand (gently) before doing another coat. It would also be beneficial to just tap the drip with your finger so you don’t have as much to sand out.

One of us also bumped the bottom corner but I left it that way because I didn’t want to put too much paint on one area and end up with even more drips. I think it’s just easier to apply more paint than have to sand it off and then apply more paint.

I didn’t get any dirt in the piece this time but that is a super easy fix. Just wait until the paint dries and knock it out with a dry cloth. This shouldn’t mess with the finish at all.

5. Work with a Friend!

Typically I do projects on my own at my own leisure unless I am frustrated and need help. In this case, I felt there was more of a time crunch with the big move coming really soon. I didn’t want the project to take any longer than necessary so Jake could focus on packing and making the transition to Chicago.

That being said, it was so much faster to have an extra set of hands throughout the entire process. It’s also great because you have someone else to blame if things go wrong. Just kidding… sort of. If you’re looking for a project to go smoothly and take less time, definitely enlist help.

The project start to finish took a weekend and I wasn’t completely drained by the end. We bought supplies Friday night and worked from about noon to seven on both Saturday and Sunday. So really we put in about 14 hours, maybe less, since I didn’t really account for eating. Although I don’t think we really had any down time for paint and wood filler to dry.

So there you have it! 5 easy tips to make painting simpler and hopefully to help you gain some motivation instead of putting a project off. Now what you’ve probably been waiting for… before and after photos!


5 Tips For Simple Furniture Painting

5 Tips For Simple Furniture Painting

5 Tips For Simple Furniture Painting

5 Tips For Simple Furniture Painting
Have you ever tried any of these tips for painting furniture or have any other tips I didn’t mention? Let me know in the comments! 🙂

See You Around!

Lauren <3

5 Tips For Simple Furniture Painting

If you liked this post, you may also want to check out this post.

Rustic Farmhouse Guest Bedroom Mood Board

This is the second post in the guest bedroom makeover series. If you missed the first post, check it out here.

I’m definitely a girl that appreciates an old house and some well-loved furniture. This room has gotten me to be creative because the house is fairly new and the room is a blank slate. White walls, trim, wall to wall carpet, and doors.

One great thing about newer homes is you don’t have to rip out all the crap before making it nice again. I love ripping stuff out almost as much as Chip Gaines (okay maybe not quite that much) but it’s so much easier to just start with picking a design.

My favorite features that were already in the room include:

  • French door closet
  • Sage green curtains
  • Comfy futon
  • Variety of pillows
  • Crisp white trim
  • Warm white carpet
  • Nickel hardware
  • Big window

Rustic Farmhouse Guest Bedroom Mood Board

I want this room to be pretty neutral and relaxing but still crisp. I chose to go with a color scheme of greige, navy, sage, and white. The walls will be Sherwin Williams Versatile Gray, the bedspread will be navy, and I’m keeping the old sage curtains.

When my mom and I were rearranging (more about that in the next post) we found a Monet print behind the tall dresser and instantly started arguing about whether it would go in the guest bedroom or the master bedroom. She has a huge, beautifully framed, Monet in her room and the frame is what inspired her to pick Versatile Gray as the paint color. I argued that since she already has a Monet in that room she doesn’t need another. LOL.

I’m not sure if the painting pictured in the mood board below is the same as the one we found (I’m at home writing this post and only had a picture to go off of). But if it is, it goes so well with the color scheme I had picked out even before we found it.


Rustic Farmhouse Guest Bedroom Mood Board
To shop these items on Polyvore click here or on the photo.

Since the room is so white right now, it definitely needs to be cozied up. One easy way to make a room feel lived in and cozy is through adding texture and pattern. So even if you did want an all white room, it could be cozied up with some texture.

I want to make a reclaimed wood sign (pallet or barn wood) for above the bed, and I already brought in the chair that I redid for my mom to add some pattern.

Rustic Farmhouse Guest Bedroom Mood Board

They have some throw pillow inserts in the closet and if I feel crafty maybe I’ll make some fun covers for them.

Another easily interchangeable way to add texture is with throw blankets. I would love to get one of the blankets pictured from Target. They look so cozy!

One thing I like about these ideas for adding texture is that you can always change them whenever you get the urge to try a new design. There’s just something so refreshing about being able to swap out a few items and getting a completely different look.

What’s your favorite way to add warmth and texture to a room?

If you liked the mood board don’t forget to share it!

See You Around!

Lauren <3

5 LOGICAL Reasons to Paint Kitchen Cabinets

The night before Chris and I were going to tackle painting the kitchen cabinets he decided that he wanted to ask permission to paint. I got really anxious because there was always the slight chance that she would (ridiculously) say no. Mind you I already had taken off all of the upper cabinet doors along with all the hardware. Did I also mention he had no part in helping with that? Ugh. Boyfriends.

I’m not going to lie, growing up I was a rule follower and I asked permission for everything. I just couldn’t stand the thought of my beautiful white cabinets being torn from my grasp when I am so very capable of painting them myself. She didn’t say no, but she did say she would have to ask her husband. Her husband said NO. AGHHHH. I was furious because I felt like he just didn’t understand, and he hardly does much with the rentals anyway. I wanted to scream and tell her to woman up and realize she doesn’t need her husband’s approval. However that probably wouldn’t solve a thing and I would still have ugly cabinets. So instead I decided to have Chris give these reasons why they should change their minds.

5 LOGICAL Reasons to Paint Kitchen Cabinets | Flip This Rental1. Cabinet Damage

Our cabinets have several spots where they are obviously worn down. There are scratches on one cabinet door (no idea how those got there), finish worn down near handles and edges of doors/drawers. Even after I thoroughly cleaned/degreased everything twice the edges of the cabinets are gummy feeling. A few of the cabinets feel gritty and not smooth like some of the less worn down doors. This is not unusual for old cabinets, but the damage really makes the kitchen look run down.

2. Easy to Clean and Repair

Going along with the previous point, painting the cabinets will make it much easier to clean and repair any spots that get worn out. Putting myself in the landlord’s shoes I know I would want to efficiently clean and make any repairs from the time one tenant moves out, and another one moves in.

It’s harder to see dirt and grime on the cabinets the way they are now because the color of the cabinets exactly matches grease that might splatter out of a frying pan. What kinds of dirt, grime, or food do you know of that is white and will cling itself to a kitchen cabinet? none (okay maybe marshmallow fluff? 😉 ). In another setting cabinets that hide grime are a good thing because they create less work and hide the dirt. In a rental setting white cabinets make it really easy for a landlord to see how dirty the cabinets are, and to make a quick estimate of how long it will take to clean between tenants.

3. New Update for Cheap

Or in our case a new update for $0. It really cannot get any better than that. I respect it if the landlord’s are hesitant because they really like the look of wood and they don’t want to cover it up. However, we have plenty of leftover paint and primer that they already paid for to paint the walls. It would be the same amount of work if not more to sand and re-stain AND it would end up costing them more money in the long run.

5 LOGICAL Reasons to Paint Kitchen Cabinets | Flip This Rental4. White Paint Opens up the Space

The kitchen in our apartment is really small and feels very claustrophobic because of the dark colors. Using light colors tricks your mind into thinking the space is actually bigger than it is. I especially noticed this when I took the upper cabinets doors off because the insides are actually already white. A decent sized kitchen is on a lot of people’s wishlist when it comes to homes, and at least white cabinets will make it not seem so cramped. Our home is located in a residential area a block or two away from the school. This means the property should really be trying to attract small families. Families generally do a decent amount of cooking so it makes sense to have a kitchen that will fit those needs.

5. Painted Cabinets are Popular

There are images all over Pinterest of painted cabinets, how to paint cabinets, and why you should paint cabinets. These days people are ditching the wood for a crisp paint job. Brains over beauty is generally the way to go. In this case painting the cabinets white is both brains and beauty. Especially in the business of rental properties it is critical to understand what a vast majority of people will be looking for in a home, and not just a select few. I can safely say that a vast majority of people are NOT looking for retro yellowy weird wood grain cabinets.

Obviously I want my living space to be appealing to me, but I also understand that I do not own it and some day someone else will have to work their style into the home as well. Throughout all of my projects I have held this mentality and that’s why it is frustrating to me that they said no to painting the cabinets. To me it seems like a well thought out business move. Hopefully after explaining these points to them they will change their minds.

5 LOGICAL Reasons to Paint Kitchen Cabinets | Flip This Rental

If you liked this post don’t forget to share it!

See You Around!

Lauren <3