As I mentioned recently, I’m updating a chair for my mom, and the most difficult part was I could not save the old fabric as a template. This was challenging, but I will show you in this post how I reupholstered my chair without using a pre-existing template.
When I first got the chair I cleaned it and used some Restor-A-Finish on it. You can check out the first stages of that here.

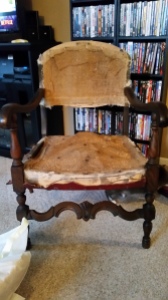
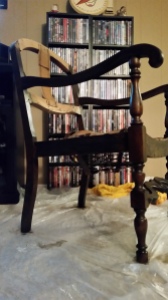
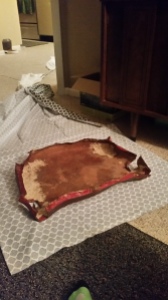
The picture above is what the chair looked like in the very beginning before I cleaned it.
The next step in the process was to completely gut it and take all the old fabric off. There were a million and one nails on this thing and some of them were underneath a layer of fabric. This made it impossible to pull the fabric off without ripping it.
Another reason I couldn’t use the old material as a template is because it wouldn’t lie flat in order to cut the new fabric in the same way.
I also wanted to upholster the chair differently to leave more of the wood exposed. The old upholstery didn’t do the beautiful chair justice.
So, the point is it IS possible to reupholster a chair with no previous template to go off of. No matter what your reason is, I just happen to have a few. A lot of blog posts I read on reupholstering made it seem like “FOR THE LOVE OF GOD PLEASE SAVE THE OLD FABRIC OR YOU WILL DIE”. Which now having done this chair, that’s a hunk of bologna. You might cry, but you won’t die.
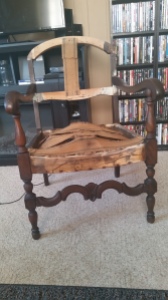
Anyway, so after I wrestled with this thing for a while the chair was down to this stage:
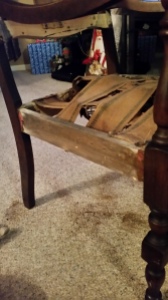
Underneath the upholstery there was a wool and straw filler. Below that it had burlap on the seat, backrest, and underneath (pictured above). I took this off because I would be adding a thick cushion, and the straw was all over it and messy.
Underneath the burlap was burlap straps. I left these on because they are the support of the seat which go over the springs on the inside. At this stage, I vacuumed the whole chair really well to get any dirt and straw that was leftover.
One strap wasn’t nailed down on one side so I stapled that back down.
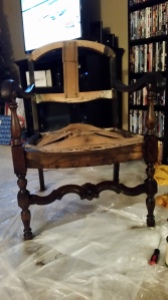
The front and back of the chair wasn’t stained where the old fabric was, and the sides of the chair were sort of stained.
To make the color all look even I got a stain to match closely with the existing color and re-stained the whole chair. I went to my local store that sells General Finishes products, and apparently I’m lucky because there aren’t many retailers around here even in bigger towns. I told the lady about my project, and she helped me pick a matching finish that would work well. In the end, I chose Brown Mahogany in the water based stain.
Here is a picture where you can see the contrast with the stained areas.
To prep the chair for stain I sanded the whole thing down with 180 grit first followed by 220.
After the first layer of stain you can tell that the unstained parts are starting to more closely match the rest of the chair.
When I went back over the chair the second and third times I only went over the areas that were lighter in order to try to get a more uniform look.
After staining, I was ready to cut my cushions. To do this I measured the width of the top part of the seat, and the bottom part of the seat because they weren’t the same length. I then cut on an angle from the top to bottom on both sides making a trapezoid.
For the back cushion, I first measured the highest part at the top of the backrest and the lowest part at the bottom. This gave me a rectangle. Then I held the cushion against the chair like so:

After I held the cushion up you can see where I made my marks with a sharpie. Then I took my box cutter and made the rounded top.
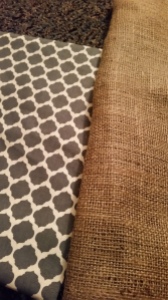
The next step after making my cushions is adding the fabric. I chose the gray patterned fabric for the seat and back.The burlap is for underneath and behind the chair.
First I decided to upholster under the chair. To do this I had to cut out little squares where the fabric had to go around the legs. This reminded me of my high school math days and terrified me. You know those math problems where you have to find the area of a square with pieces cut out? That’s what this felt like at first.
Once I stopped being caught up on perfection and stepped back to think I figured it out as I went. Just hold the fabric up to the edge of the leg and make a mark where it needs to be cut. Or measure how long it needs to be.
Instead of cutting the whole piece I needed, I just measured and stapled as I went along and this made it pretty easy. I left enough excess to tuck the edge under so it was clean cut. My tip to you is to always air on the side of caution even if you measure the cuts. Cut less first and go back later rather than cutting too much to begin with.
I used this same technique to upholster the seat and back, with some adjustment to how I did the back.
Pictured above is the underneath of the chair reupholstered.
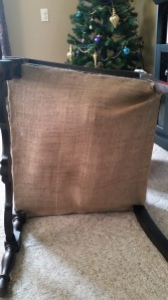
For the back of the chair, the first thing I did was cut out a chunk of burlap and stapled it to the back. To staple the fabric around the top of the chair I cut a piece that was approximately the right size leaving a little extra. This is the only time I used the old upholstery as a “template”.
Then I used a combination of tucking and stapling in the best way possible to get a tight, clean look.
The same thing with the seat in the back you can see a few weird folds, but that’s because there was no other way to get as precise of a look.

Here is the side view where you can see the combination of stapling and tucking.
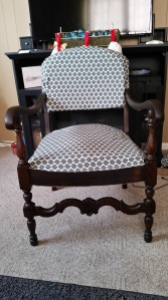
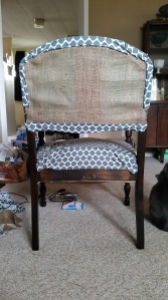
The finished view of the front! This is my favorite view.
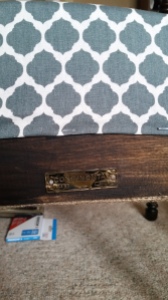
And I was even able to nail the original tag back on 🙂 I tried so darn hard to save that.
This thing was basically a giant pain in my butt almost the entire time I was working on it, but I am really happy to have restored a classic piece of furniture. I think I will take on some more upholstery projects in the future, but only if they are more simple to upholster.
Here is my materials list and cost breakdown:
- Chair – Free!
- General Finishes Water Based Stain in Brown Mahogany – $11.31
- 1 yd burlap fabric – $4
- 3 yds gray patterned fabric – $12/yd = $36
- two 2 in dense cushions – $15/ea = $30
- 5/16″ Staples – $4.23
This project in total would cost about $85, but I got some serious deals at JoAnn’s when I bought my fabric and cushions so it cost me a little over $60.
I delivered it to my mom when Chris and I went over to her boyfriend’s house for Christmas. She was so excited, and loves how it looks! I told her if she ever wants to get rid of the chair, it has to come back to me.

The before and after still amaze me!
Would you attempt an upholstery project without a template?
See You Around!
Lauren <3


