Bedroom Reveal and Item Sourcing

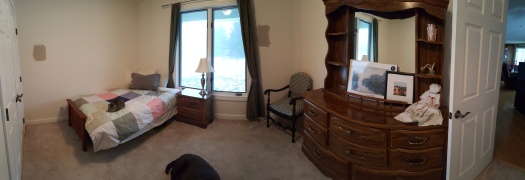
Now that it’s been almost four months since I moved in it’s about time that I give you a bedroom reveal. But first, let me show you what my room looked like as a blank slate.

Room Before

This room has a lot of white and a lot of windows. I was actually kind of excited to decorate with the white (there’s a lot of white throughout the whole apartment). I’m not so excited about the weird texture on the top half of the walls, but I’ll live.

It was also pretty interesting to see how the room was set up when my friend lived here. Honestly, I think that helped me get a better idea of what I wanted and reach the “end” result quicker. As I’m sure you know, there really is never any end to decorating a room.

Room Reveal

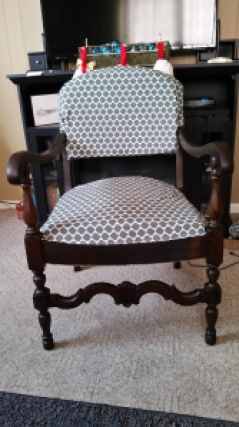
When I first walk into my room this is what I see. I got the desk from my step mom, the chair from my mom, and the wool blanket belonged to my maternal grandfather. The corkboard is a DIY I did a while back.  

Looking to the right of the room you see the “closet” area. The bump-out is actually my roommate’s closet which left just enough room for two short rods on either side of it. I also keep clothes in the plastic drawers and in the cubes.

I bought the mirror from Target when I moved in and I got the tapestry from Amazon a while ago. The stickers on the drawers are reusable chalk labels by VersaChalk.

Looking to the left in the room you’ll see my bed.

When I moved in I already had two pillows, and bought two additional pillows from Walmart. I bought a sheet set from TJ Maxx which had a fitted sheet, flat sheet, and two pillow cases. The set is a very soft gray and almost has a slight purple undertone to it. The back two pillow cases are navy cotton from Target. The gray blanket is also a purchase from Target that I got two or three years ago. The blanket I linked to is basically the same one, except mine has a faint herringbone pattern in it. 

On my night stand I have a DIY painting I made, a geometric container from TJ Maxx, and a lamp from Target (which I bought a few years ago). Again, the lamp is the same it just doesn’t come in gray anymore. The trunk is an upcycle I did a while back and you can read about that here.


In case you missed it, my curtains are made from sheets and you can read all about the cost break down and where I got my materials here.

I’m really happy to have my own space, and I’m glad I put some thought into each of the items in my room. It feels more cohesive than any other room I’ve had before and it’s definitely a relaxing space to go at the end of the day.

What do you think makes a space feel like your own?

See You Around!

Lauren <3

Follow my blog with Bloglovin

Rustic Farmhouse Guest Bedroom Mood Board

This is the second post in the guest bedroom makeover series. If you missed the first post, check it out here.

I’m definitely a girl that appreciates an old house and some well-loved furniture. This room has gotten me to be creative because the house is fairly new and the room is a blank slate. White walls, trim, wall to wall carpet, and doors.

One great thing about newer homes is you don’t have to rip out all the crap before making it nice again. I love ripping stuff out almost as much as Chip Gaines (okay maybe not quite that much) but it’s so much easier to just start with picking a design.

My favorite features that were already in the room include:

  • French door closet
  • Sage green curtains
  • Comfy futon
  • Variety of pillows
  • Crisp white trim
  • Warm white carpet
  • Nickel hardware
  • Big window

Rustic Farmhouse Guest Bedroom Mood Board

I want this room to be pretty neutral and relaxing but still crisp. I chose to go with a color scheme of greige, navy, sage, and white. The walls will be Sherwin Williams Versatile Gray, the bedspread will be navy, and I’m keeping the old sage curtains.

When my mom and I were rearranging (more about that in the next post) we found a Monet print behind the tall dresser and instantly started arguing about whether it would go in the guest bedroom or the master bedroom. She has a huge, beautifully framed, Monet in her room and the frame is what inspired her to pick Versatile Gray as the paint color. I argued that since she already has a Monet in that room she doesn’t need another. LOL.

I’m not sure if the painting pictured in the mood board below is the same as the one we found (I’m at home writing this post and only had a picture to go off of). But if it is, it goes so well with the color scheme I had picked out even before we found it.


Rustic Farmhouse Guest Bedroom Mood Board
To shop these items on Polyvore click here or on the photo.

Since the room is so white right now, it definitely needs to be cozied up. One easy way to make a room feel lived in and cozy is through adding texture and pattern. So even if you did want an all white room, it could be cozied up with some texture.

I want to make a reclaimed wood sign (pallet or barn wood) for above the bed, and I already brought in the chair that I redid for my mom to add some pattern.

Rustic Farmhouse Guest Bedroom Mood Board

They have some throw pillow inserts in the closet and if I feel crafty maybe I’ll make some fun covers for them.

Another easily interchangeable way to add texture is with throw blankets. I would love to get one of the blankets pictured from Target. They look so cozy!

One thing I like about these ideas for adding texture is that you can always change them whenever you get the urge to try a new design. There’s just something so refreshing about being able to swap out a few items and getting a completely different look.

What’s your favorite way to add warmth and texture to a room?

If you liked the mood board don’t forget to share it!

See You Around!

Lauren <3

Guest Bedroom Makeover – Home Away From Home

Wow. So it’s been forever since I last posted. I finished my last semester of classes for undergrad in December and at the beginning of January, I started an internship. I graduate in May just to turn around and start my master’s in the fall! Phew.

All of the big changes really took a toll on my mind and body, so blogging wasn’t a top priority. I kept pushing without taking care of myself as much as I should have.

But now I’m feeling myself again and possibly on my way to being even better than before 😀

But back to the internship. If I drove from home it would be a 2-hour drive twice a week which means I would probably have to wake up at 6 am. Ew.

The good news is my mom and her boyfriend live 20 minutes away from my office. Jackpot. And in this crappy Michigan winter that makes life so much easier.

I’ve been staying in the guest room which they basically use as a giant storage closet.

Guest Bedroom Makeover - Home Away From Home

This is pretty much the before picture. The bed was originally coming out of the corner on an angle and the stuff wasn’t shoved into the corner as much.

They have a really nice house and it just makes me sad seeing a room not living up to its potential.

And since I’ll be staying here until May I figured it would be a great way to (1) make it feel homier for me and (2) make it feel homier for the future guests.

Guest Bedroom Makeover - Home Away From Home

Above is the product of my second step. Obviously, you can see there is less stuff shoved in the corner. I put a bunch of sleeping bags and pillows in a bag in the closet, some sheets and blankets in drawers, and shoved other stuff under the bed.

Ideally, I would like to have my mom sort through stuff with me, take some things down to the basement, and figure out better storage options for the rest.

I think the tall dresser would be better positioned in the hallway or even in the closet.

Guest Bedroom Makeover - Home Away From Home

My mom has some horse tack in here which might honestly be the best place for it for now. The other stuff though could definitely get moved out/around.

Guest Bedroom Makeover - Home Away From Home

In this picture, you can see I put my quilt on the bed because it made it feel homier for me. This will eventually get changed to match the room design, and my mom even mentioned buying a new bed set. I also moved this lamp in here which was first in the living room, then my mom moved it into her office. So we’ll see if that’s permanent.

Guest Bedroom Makeover - Home Away From Home

I like the footboard but I don’t think it goes perfectly with the style I have in mind for the room. Maybe if I’m feeling motivated I will stain it a darker color.

Also, say hi to Louie. He’s such a cool cat and pretty much in love with me. Lol

The Plan

Besides all the organizing I already talked about, I also want to do some DIYing and decorating. So here’s the short list of what I want to do:

  1. Organize/Declutter all the stuff
  2. Paint the walls
  3. Figure out the best furniture positioning (bed, side table, tall dresser, bring in a chair?)
  4. Paint the side table and dressers
  5. Stain the bed?
  6. Get a new bed set
  7. Decorate with objects around the house/thrifted/new

In future posts I hope to update you on how the organizing goes as well as share an updated design plan. I get the feeling that my mom will be open to my ideas so this should be a fun project for the next few months!

What are some amenities that make you feel more comfortable when you’re the guest? Or what are some things that you try to do for guests in your home?

Thanks for reading and as always…

See You Around!

Lauren <3

To see the next post in the series, click here.

The Easiest Pallet Headboard That Ever Existed

Recently, Pinterest created a lot of buzz about reclaimed wood and pallet furniture . So, I wanted to get my hands on some pallets and see what all the craze was about. The first project I wanted to do was create a simple headboard for my apartment bedroom. As you may have already seen here, my apartment has white textured walls and in order to make a cozy space I needed to add color as well as more visual interest.

My goal with this project was to not spend any additional money, and I also wanted a piece that I wouldn’t feel bad trashing once I moved out of my apartment. A pallet was perfect because you can find tons of them for free, and upcycling gives them an extended life.

To begin any pallet project you need to make sure they are safe to use. This post helped me learn what the different markings on a pallet meant, and which markings meant a pallet was unsafe to use. Below is a picture of the stamp on my pallet:

Flip This Rental | The Easiest Pallet Headboard That Ever Existed - Pallet Markings

The label marking on the left side is the stamp of the International Plant Protection Convention (IPPC) and this stamp means the pallet is up to the IPPC’s standards (read the linked post above for more details). The upper right marking MX 1255 is the country code (Mexico) followed by the registration number of the supplier. Below that, HT means the pallet was heat treated opposed to MB – treated with Methyl Bromide. Do not use pallets with an MB stamp!

After making sure my pallet was safe to use I began using a palm sander to smooth out the pallet. Using that thing didn’t last long! There was either something wrong with it or I’m just a weakling. It was bouncing all over and made my hand tingle way too much. So instead I decided to switch over to the good old fashion non-electric sanding block. A headboard doesn’t need to be baby butt smooth either, so a regular sanding block worked just fine. I sanded it just enough to make sure I wouldn’t get any slivers. This is how my pallet looked to start:

Flip This Rental | The Easiest Pallet Headboard That Ever Existed

To add color to my pallet I decided to use leftover Howard Restor-A-Finish in Dark Walnut from this project instead of buying a stain. To apply the finish you can just use an old rag or use steel wool. Fine steel wool is typically used to buff out scratches in wood that is being restored. I used steel wool since I had quite a bit and I didn’t know if the Restor-A-Finish would stain my rag or not. We don’t have a lot of crappy rags around our house and I didn’t want to risk it ;).

Flip This Rental | The Easiest Pallet Headboard That Ever Existed

Above is a close up of the contrast between the wood with finish and without. I really like how the finish emphasized the grain in the wood which will add visual interest for my room.

Flip This Rental | The Easiest Pallet Headboard That Ever Existed

You can especially see in the board on the right in the above picture that there are little holes and imperfections in the wood. I used Q-tips dipped in the finish to get into the little crevices. it worked really well, but I went through quite a few Q-tips because the finish drained out of them really quickly.

Flip This Rental | The Easiest Pallet Headboard That Ever Existed

Here is a farther back picture of the difference between with and without finish.

Flip This Rental | The Easiest Pallet Headboard That Ever Existed

Here is the finished product up on my bed! This project was so simple I really could not have asked for it to go any smoother. To get the headboard up I pulled my mattress out a little and the frame stayed put. I simply set the headboard on top of my bed frame. Once I pushed my mattress back the pallet wobbled a little, so I stuck two command strips on the back of each side to keep it held against the wall.

Now I will share some complimentary glamour shots 😉

 Flip This Rental | The Easiest Pallet Headboard That Ever Existed Flip This Rental | The Easiest Pallet Headboard That Ever Existed Flip This Rental | The Easiest Pallet Headboard That Ever Existed

As soon as I got the headboard up on my bed I was so giddy. I can’t believe how easy this project was and it looks great! I absolutely love how the wood looks worn in some places. It has a rustic barn feel to it. I have two more pallets at home and I already have ideas for them! I’m not sure how soon I can tackle those projects, but I’m definitely excited to get started.

See You Around!

Lauren <3

Pssst.. If you liked this post don’t forget to share it!

Flip This Rental – College Style

Now that I’ve been settled in to my apartment for almost two weeks I figured it’s time to give you a little tour of my bedroom! The main goal with my room was to fill as much of the wall space with color as I could. I ordered a tapestry from Amazon and it practically fills up my entire East wall. To the right of my wall I hung a big map from my kayaking trip last summer.

Flip This Rental - College Style | My Apartment Bedroom

Above is the panoramic view of my room. I was standing in the doorway when I took this picture. As you can see the room isn’t huge, but it’s a decent size.

Flip This Rental - College Style | My Apartment Bedroom

This is supposed to be an entryway bench but I use it to store jeans, pajama pants, and leggings. I put the bench on risers so it would be easier to grab stuff and I wouldn’t have to bend way over. It also makes it blend in with the room better because all of my furniture is about the same height. On top of the bench I have my textbooks, a jar of change, my jewelry holder, and upcycled cans used for holding pens, pencils, and what not. The lampshade is for a future DIY project.

Flip This Rental - College Style | Small Gallery Wall

This is my small gallery to the left of my window. Once I print out pictures I will add them here to fill in the spaces.

Flip This Rental - College Style | Bed Details

Here are the little details on my bed. I love the idea of having basic black and whites and adding splashes of color with artwork and small objects. The puppy was a valentine’s day present from my boyfriend and he keeps me from getting homesick (yes I know that sounds childish).

Flip This Rental - College Style | Desk Decorations

Everything you see in the gallery above my desk is a DIY I made. I made my calendar from a cheap poster frame with paint samples and washi tape to divide up the days and weeks. I write on it with a whiteboard marker. The vase is a spray painted wine bottle with “flowers” made from melted CD’s and gold wire.

Flip This Rental - College Style | Bedroom Closet

My closet isn’t very pretty but for now it’s pretty functional. I have two different sets of drawers for more clothes and the black bin is all my extra shoes. To the left is my laundry basket, a box full of sweaters, and on top of that I have a bag full of purses I’m currently not using and other bags. On the shelf I fold all my sweatshirts, t-shirts, and tank tops as well as extra sheets for my bed.

Flip This Rental - College Style | Easy Scarf Storage

This is my scarf rack inside my closet. I made this by putting two command hooks on each end and using a curtain rod. Most of the scarves are hung up with shower curtain rings. I didn’t quite have enough otherwise they’d all be hung on rings. The winter fluffy scarves are towards the back and the lighter scarves are in the front.

Flip This Rental - College Style | My Apartment Bedroom

I keep my printer on top of this storage ottoman. In the ottoman are random things for hanging pictures and just stuff I don’t use on a regular basis. Below the Arctic Monkeys poster I plan on hanging two sheets of paper. One will have all of my professors office hours and contact information, and the other paper will have the detailed goals that I set for this semester. When I took this picture I just realized the trim on the closet and the trim on the door are different colors and grain :’D gotta love college housing.

I love how cozy my room turned out and it’s definitely nice being able to have a space to call my own since I don’t have that at home. So what do you think? Did I do a good job hiding the fact that I live in cheap bland apartment?

See You Around!

Lauren <3