Now that it’s been almost four months since I moved in it’s about time that I give you a bedroom reveal. But first, let me show you what my room looked like as a blank slate.
Room Before
This room has a lot of white and a lot of windows. I was actually kind of excited to decorate with the white (there’s a lot of white throughout the whole apartment). I’m not so excited about the weird texture on the top half of the walls, but I’ll live.
It was also pretty interesting to see how the room was set up when my friend lived here. Honestly, I think that helped me get a better idea of what I wanted and reach the “end” result quicker. As I’m sure you know, there really is never any end to decorating a room.
Room Reveal
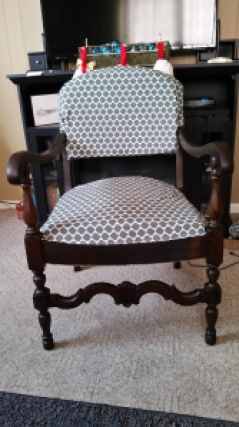
When I first walk into my room this is what I see. I got the desk from my step mom, the chair from my mom, and the wool blanket belonged to my maternal grandfather. The corkboard is a DIY I did a while back.
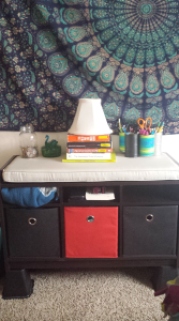
Looking to the right of the room you see the “closet” area. The bump-out is actually my roommate’s closet which left just enough room for two short rods on either side of it. I also keep clothes in the plastic drawers and in the cubes.
I bought the mirror from Target when I moved in and I got the tapestry from Amazon a while ago. The stickers on the drawers are reusable chalk labels by VersaChalk.
Looking to the left in the room you’ll see my bed.
When I moved in I already had two pillows, and bought two additional pillows from Walmart. I bought a sheet set from TJ Maxx which had a fitted sheet, flat sheet, and two pillow cases. The set is a very soft gray and almost has a slight purple undertone to it. The back two pillow cases are navy cotton from Target. The gray blanket is also a purchase from Target that I got two or three years ago. The blanket I linked to is basically the same one, except mine has a faint herringbone pattern in it.
On my night stand I have a DIY painting I made, a geometric container from TJ Maxx, and a lamp from Target (which I bought a few years ago). Again, the lamp is the same it just doesn’t come in gray anymore. The trunk is an upcycle I did a while back and you can read about that here.
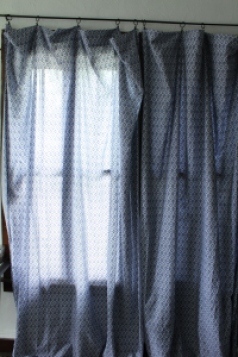
In case you missed it, my curtains are made from sheets and you can read all about the cost break down and where I got my materials here.
I’m really happy to have my own space, and I’m glad I put some thought into each of the items in my room. It feels more cohesive than any other room I’ve had before and it’s definitely a relaxing space to go at the end of the day.
What do you think makes a space feel like your own?
Easily the best feature of my new room is the insane amount of windows I have. On the other hand, having an insane amount of windows is not so great when you’re trying to sleep.
When I moved in, there were plastic blinds on half of the windows and the ones that were left looked like junk. My friend that lived here before me tacked blankets up to keep the light out. I knew I was going to go in a different direction and wanted something pretty. Something that would block out the light when I wanted and let light in when I wanted.
As I’m sure you know, curtains are freaking expensive, especially when you have a bunch of really big windows. So, I made curtains out of sheets which was an idea I had seen from a few different bloggers on Pinterest. In this post I’ll show you the materials I used and their cost so you can weigh the pros/cons of doing a similar project.
My Window Dimensions
In my room I have 3 windows that are all 70 inches by 70 inches. Therefore, I needed 6 curtain panels that were at least 35 inches wide and 70 inches long. Obviously, these dimensions would cover the window but the length would not look great.
Ideally, curtains are hung at least 3 inches above the window. Personally, I like the curtains to touch the floor but not pool too much. To make sure I got sheets that were long enough, I measured from the top of the window to the floor and added three inches.
Curtain Materials
After searching around a little bit for different sheets I decided on the Mainstays 200 Thread Count Sheet in twin size. They had the best color option at the cheapest price so it was an easy decision. I used both a solid and patterned sheet to make the curtains thicker as well as reversible. I chose navy for the solid color and the blue diamond ikat pattern.
These sheets are $4.97 each and I needed 12 (6 patterned, 6 solid) for a total of $59.64. Each sheet is 66 inches wide by 96 inches long. In a different room I think one sheet would have been fine, but I wanted to block out a lot of light in my bedroom.
Below is an example of how much light 1 sheet (left) blocks versus 2 (right).
Cost of DIY Curtains (Fabric) and Pre-Made Curtains
I thought I was shelling out a decent amount of money for these curtains, so I was interested to see how much more I would have spent to buy fabric or just straight up buy curtains and achieve a similar look.
If I would have bought fabric from JoAnn’s:
Lining Fabric (54″ wide) – $3/yd (on sale) x 16 yds (to match 96″ length)= $48 (not on sale = $96)
Print Fabric (54″ wide) – $4.50/yd (on sale) x 16 yds = $72 (not on sale = $144)
The total price for just fabric would have been $120 on sale, $240 not on sale!
I found a pretty good deal at JCPenney on 50″ x 95″ back tab curtains for $13.99 each (clearance) times 6 panels for a total of $83.94. These aren’t that much more expensive, but the user reviews mention these curtains are not the best at blocking light.
Curtain Hardware
In all honesty, I didn’t want to do a whole lot of work besides hanging the curtains up so I didn’t get all fancy and make back tabs or put in grommets or anything. Instead, I just bought clip rings in oil rubbed bronze. There are 7 rings in each package, each package costs $4.74 and I bought 5 packages for a total of $23.70. I ended up using 5 rings on each panel so I still had 5 left over.
Last but not least I got curtain rods from Home Depot, also in oil rubbed bronze, for $6.97 x 3 for a total of $20.91. They’re 48 – 84 inches long and 7/16 in. thick. I was trying to get the cheapest option possible, but aesthetically I think a thicker curtain rod would be better.
Total Cost Breakdown
here is an overview of the items I bought and their costs:
12 twin sheets x $4.97 each = $59.64
5 packages of (7) curtain rings x $4.74 each = $23.70
3 curtain rods x $6.97 each = $20.91
Bringing the total cost of curtains and hardware (without tax) to $104.25
I absolutely love the way these curtains turned out and I think they add a lot of style and function to the room (but hey, I may be a little biased). I know in my next apartment I won’t be using all of the panels but I think it was a great investment compared to buying pre-made curtains.
What do you think? Would you try sheet curtains, DIY curtains out of fabric, or just buy curtains? I would love to hear your pro/con list!
Recently, Douglas Elliman, a global real estate firm, contacted me to participate in their Pantone Color of the Year challenge. I will not be compensated for this post, and all opinions are my own. To see Florida property listings by Douglas Elliman and for more tropical inspiration, click here.
Spring is right around the corner, and St. Patrick’s day is even closer. So, now is a good time to share some ideas on how to work green into a room. Specifically, Greenery, Pantone Color of the Year for 2017.
According to Pantone’s website, “Greenery signals consumers to take a deep breath, oxygenate and reinvigorate” (Pantone). It “symbolizes the reconnection we seek with nature, one another, and a larger purpose”.
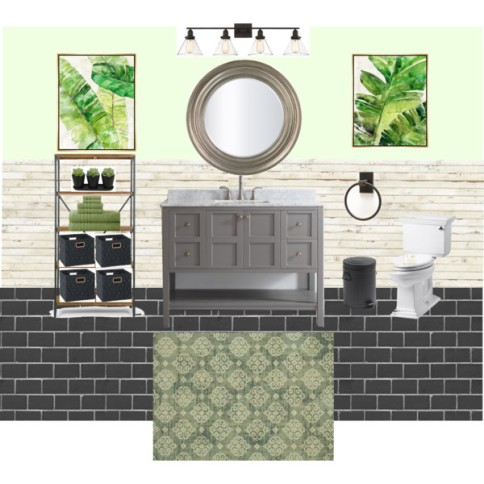
Originally I thought that this wouldn’t be a color that I would paint on a wall but when I got thinking, I realized it would look great in a bathroom. Greenery seems to be a rejuvinating color especially in combination with neutrals.
I think the best tip I have for this color, and something I would do in my own home, is to style the room with a half wall. For example – shiplap, board and batten, or beadboard depending on your personal style.
This way there is texture added to the room, but it will tone down the vibrant green on the wall.
I created a mood board with my ideas on how to use this color in a bathroom.
One thing that I really like about the way this room is put together is the easily interchangeable color scheme. The green tropical feel is mostly emphasized by all the green accessories and it wouldn’t be too much work or money to change the paint color if you decided it wasn’t for you.
Blue is one of my favorite colors and it seems that I always end up thinking about doing a beachy look for a bathroom and I think that comes from the fact that there are a lot of blue accessories for bathrooms. To see what I mean, just look at my bathroom.
I think this is a fun and different way to have a tropical bathroom without making everything blue. Although I still think it would look great to add in some blue accents.
How would you use Pantone’s 2017 Color of the Year?
Sometimes we tackle projects because we want to test out a new idea, or spend some time doing something we enjoy, but we don’t necessarily expect them to be easy or quick. Other times we know a project will make a big impact in our home but we don’t want to have all the fuss that goes with it, so we put it off.
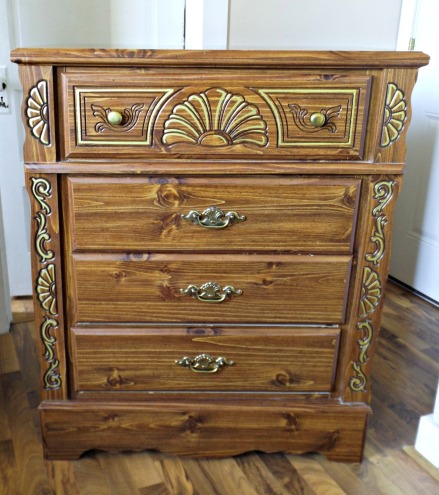
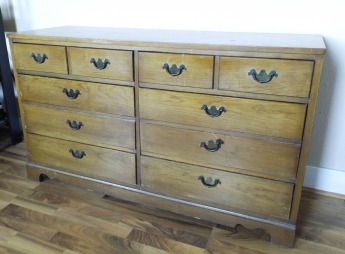
One of my friends, Jake, has two dressers that didn’t go with the rest of the pieces he owns, so last spring we began throwing around ideas on how to refinish them. The project kept getting put off because we’re both busy people, and we had to be creative in figuring out a decent workspace.
Now Jake is moving to Chicago in less than a month, so I knew we needed to get our act together and get this project done. I wanted him to be able to have furniture he loves to take with him to a new place and have a fresh start.
While doing this project, I was conscious about the things that make a project less daunting, and these are the 5 tips I wanted to share with you!
1. Listen to Your Piece
This first tip I think really applies to houses, but can also apply to furniture as well. In a house, we take clues from the architecture to guide us to different design choices. I think in some ways furniture does the same thing. Maybe this is me justifying laziness, but after a while it becomes clear how I want to refinish a piece. Whether it’s paint, stain, fun details, or new hardware.
This time I didn’t have the furniture in my house to stare at nonstop so it was a little trickier. Jake didn’t really know what his style was, or more accurately how to explain it. To find the best fit, I took cues from the other objects he has in his apartment. He likes clean lines, silver metals, and doesn’t mind dark colors. Overall, he’s drawn to a crisp look with some texture thrown in here and there.
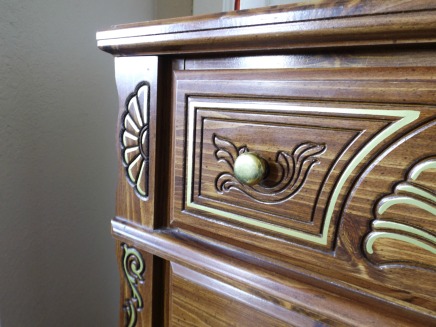
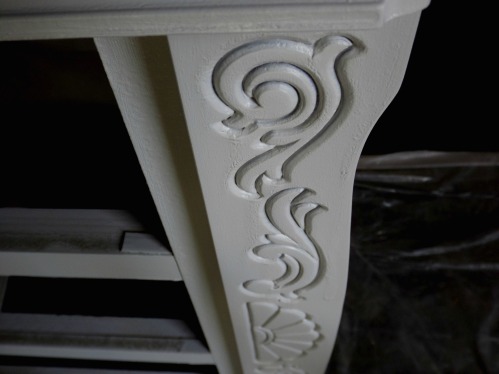
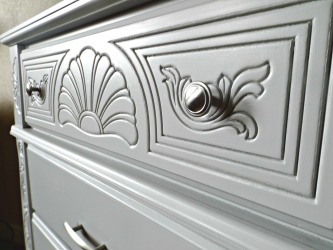
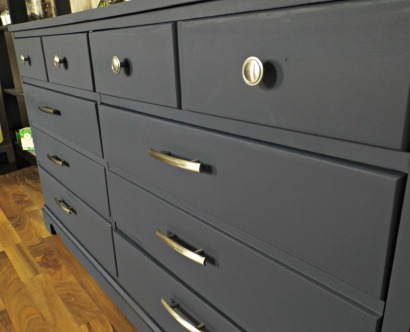
As you can see, both dressers have outdated hardware that doesn’t go along with Jake’s aesthetic. One of the first things we decided was to replace the hardware with matching hardware for both dressers.
The dressers don’t have anywhere close to the same style so I thought it made the most sense to paint them different colors. I knew I wanted to use General Finishes and Jake decided seagull gray milk paint for the tall dresser, and midnight blue chalk style paint for the long dresser.
2. Use Sprayer Without Paint
After sanding the tall dresser I kind of hit a wall of oh crap how are we going to get all the dust out of these details? And then I was like oh! Canned air. And then I was like OH. I can just use my sprayer without paint to do the same thing.
I’ve never heard of anyone else doing this so maybe it’s just too obvious to blog about, but it was definitely an aha moment for me.
3. Paint Consistency and Spraying Technique
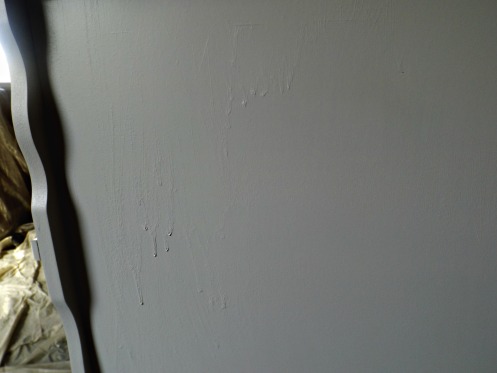
I didn’t have any issues with the long dresser, likely because that is the second one we painted. However, there were some flukes with the tall dresser painted with milk paint.
I have a HomeRight Finish Max HVLP sprayer and in the manual, it says to thin paint out so that it runs through the cup that comes with the sprayer in 25 to 40 seconds. When I timed it, my paint was running through closer to 25 seconds, but I was ending up with drip marks.
I didn’t troubleshoot all the possible issues, but I think it was because my paint seemed a little runny. It also could have been because I was applying too much paint at once and standing too close to the piece. These are some general rules I like to keep in mind when I’m spraying to avoid issues like this:
Make sure your paint is a good consistency
spray in even strokes, starting the spray away from the piece then moving across
Let go of the trigger after each spray to avoid moving too quickly and creating areas with too much paint
Don’t stand too close (or too far) from the piece. I generally stand about a foot or so away.
4. Fixing Mistakes, Don’t Panic!
However, if you do mess up (like I did) don’t freak out! Whether it’s drip marks, accidentally touching the wet paint, or dirt in wet paint these are all fixable. In spots like the ledges of the drawer frames I wiped drips off because it wasn’t going to affect the finish. In spots like the side of the dresser, I just left them to sand (gently) before doing another coat. It would also be beneficial to just tap the drip with your finger so you don’t have as much to sand out.
One of us also bumped the bottom corner but I left it that way because I didn’t want to put too much paint on one area and end up with even more drips. I think it’s just easier to apply more paint than have to sand it off and then apply more paint.
I didn’t get any dirt in the piece this time but that is a super easy fix. Just wait until the paint dries and knock it out with a dry cloth. This shouldn’t mess with the finish at all.
5. Work with a Friend!
Typically I do projects on my own at my own leisure unless I am frustrated and need help. In this case, I felt there was more of a time crunch with the big move coming really soon. I didn’t want the project to take any longer than necessary so Jake could focus on packing and making the transition to Chicago.
That being said, it was so much faster to have an extra set of hands throughout the entire process. It’s also great because you have someone else to blame if things go wrong. Just kidding… sort of. If you’re looking for a project to go smoothly and take less time, definitely enlist help.
The project start to finish took a weekend and I wasn’t completely drained by the end. We bought supplies Friday night and worked from about noon to seven on both Saturday and Sunday. So really we put in about 14 hours, maybe less, since I didn’t really account for eating. Although I don’t think we really had any down time for paint and wood filler to dry.
So there you have it! 5 easy tips to make painting simpler and hopefully to help you gain some motivation instead of putting a project off. Now what you’ve probably been waiting for… before and after photos!
Have you ever tried any of these tips for painting furniture or have any other tips I didn’t mention? Let me know in the comments! 🙂
See You Around!
Lauren <3
If you liked this post, you may also want to check out this post.
This is the second post in the guest bedroom makeover series. If you missed the first post, check it out here.
I’m definitely a girl that appreciates an old house and some well-loved furniture. This room has gotten me to be creative because the house is fairly new and the room is a blank slate. White walls, trim, wall to wall carpet, and doors.
One great thing about newer homes is you don’t have to rip out all the crap before making it nice again. I love ripping stuff out almost as much as Chip Gaines (okay maybe not quite that much) but it’s so much easier to just start with picking a design.
My favorite features that were already in the room include:
French door closet
Sage green curtains
Comfy futon
Variety of pillows
Crisp white trim
Warm white carpet
Nickel hardware
Big window
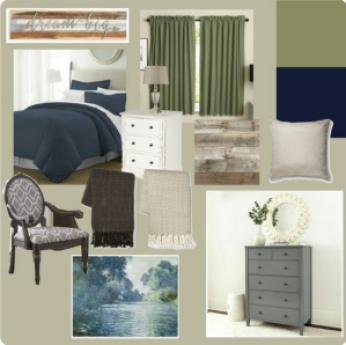
I want this room to be pretty neutral and relaxing but still crisp. I chose to go with a color scheme of greige, navy, sage, and white. The walls will be Sherwin Williams Versatile Gray, the bedspread will be navy, and I’m keeping the old sage curtains.
When my mom and I were rearranging (more about that in the next post) we found a Monet print behind the tall dresser and instantly started arguing about whether it would go in the guest bedroom or the master bedroom. She has a huge, beautifully framed, Monet in her room and the frame is what inspired her to pick Versatile Gray as the paint color. I argued that since she already has a Monet in that room she doesn’t need another. LOL.
I’m not sure if the painting pictured in the mood board below is the same as the one we found (I’m at home writing this post and only had a picture to go off of). But if it is, it goes so well with the color scheme I had picked out even before we found it.
To shop these items on Polyvore click here or on the photo.
Since the room is so white right now, it definitely needs to be cozied up. One easy way to make a room feel lived in and cozy is through adding texture and pattern. So even if you did want an all white room, it could be cozied up with some texture.
I want to make a reclaimed wood sign (pallet or barn wood) for above the bed, and I already brought in the chair that I redid for my mom to add some pattern.
They have some throw pillow inserts in the closet and if I feel crafty maybe I’ll make some fun covers for them.
Another easily interchangeable way to add texture is with throw blankets. I would love to get one of the blankets pictured from Target. They look so cozy!
One thing I like about these ideas for adding texture is that you can always change them whenever you get the urge to try a new design. There’s just something so refreshing about being able to swap out a few items and getting a completely different look.
What’s your favorite way to add warmth and texture to a room?
If you liked the mood board don’t forget to share it!
Wow. So it’s been forever since I last posted. I finished my last semester of classes for undergrad in December and at the beginning of January, I started an internship. I graduate in May just to turn around and start my master’s in the fall! Phew.
All of the big changes really took a toll on my mind and body, so blogging wasn’t a top priority. I kept pushing without taking care of myself as much as I should have.
But now I’m feeling myself again and possibly on my way to being even better than before 😀
But back to the internship. If I drove from home it would be a 2-hour drive twice a week which means I would probably have to wake up at 6 am. Ew.
The good news is my mom and her boyfriend live 20 minutes away from my office. Jackpot. And in this crappy Michigan winter that makes life so much easier.
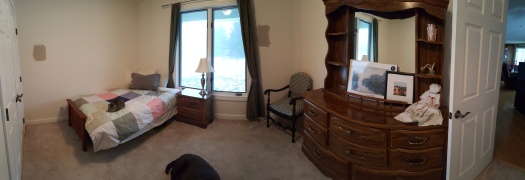
I’ve been staying in the guest room which they basically use as a giant storage closet.
This is pretty much the before picture. The bed was originally coming out of the corner on an angle and the stuff wasn’t shoved into the corner as much.
They have a really nice house and it just makes me sad seeing a room not living up to its potential.
And since I’ll be staying here until May I figured it would be a great way to (1) make it feel homier for me and (2) make it feel homier for the future guests.
Above is the product of my second step. Obviously, you can see there is less stuff shoved in the corner. I put a bunch of sleeping bags and pillows in a bag in the closet, some sheets and blankets in drawers, and shoved other stuff under the bed.
Ideally, I would like to have my mom sort through stuff with me, take some things down to the basement, and figure out better storage options for the rest.
I think the tall dresser would be better positioned in the hallway or even in the closet.
My mom has some horse tack in here which might honestly be the best place for it for now. The other stuff though could definitely get moved out/around.
In this picture, you can see I put my quilt on the bed because it made it feel homier for me. This will eventually get changed to match the room design, and my mom even mentioned buying a new bed set. I also moved this lamp in here which was first in the living room, then my mom moved it into her office. So we’ll see if that’s permanent.
I like the footboard but I don’t think it goes perfectly with the style I have in mind for the room. Maybe if I’m feeling motivated I will stain it a darker color.
Also, say hi to Louie. He’s such a cool cat and pretty much in love with me. Lol
The Plan
Besides all the organizing I already talked about, I also want to do some DIYing and decorating. So here’s the short list of what I want to do:
Organize/Declutter all the stuff
Paint the walls
Figure out the best furniture positioning (bed, side table, tall dresser, bring in a chair?)
Paint the side table and dressers
Stain the bed?
Get a new bed set
Decorate with objects around the house/thrifted/new
In future posts I hope to update you on how the organizing goes as well as share an updated design plan. I get the feeling that my mom will be open to my ideas so this should be a fun project for the next few months!
What are some amenities that make you feel more comfortable when you’re the guest? Or what are some things that you try to do for guests in your home?
This is honestly one of those projects that took a turn because I got lazy. My roommate broke my full-size mirror a long time ago and I tried to come up with a way to reuse the broken glass. I decided on making a mosaic and searched a while for just the right frame. Then I found this:
It was perfect for my original project because it was a sturdy frame with a solid backing to lay glass on. The first thing I did was sand it down a little and give it a coat of black spray paint.
I started laying the glass pieces (without glue), but this is as far as I got before giving up (or at least I told myself I would finish it later).
It looked pretty cool, but it got harder to arrange the glass pieces without much space in between. I also decided when I was finished it was going to be really heavy.
Instead I had Chris dump all the glass for me and I pulled out some leftover cork and fabric. I decided to make a corkboard for the office I keep dreaming about.
To begin I laid out the cork and measured the dimensions of the inside of the frame. I measured it out on the cork and drew the lines where I needed to cut.
After cutting I put the cork in the frame to check it was right before cutting the fabric.
To cut the fabric I placed the cork on top and cut it leaving a little bit extra to fold over the edges of the cork.
My fabric was a little wrinkly, and we have very limited resources to fix that. Iron? Nope. Dryer? Nope. DIY de-wrinkle spray made with fabric softener? Definitely nope. Instead, I tried the next closest thing to the dryer trick. Which was hanging my cut piece of fabric on the towel bar in the bathroom while I showered. Took the wrinkles right out! 🙂
To glue it together I used mod podge on the face of the cork and used my hot glue gun to glue the edges of the fabric to the back of the cork.
Then, to glue the cork to the frame I put hot glue all along the edges and an X through the middle. I had to do it quickly so the glue wouldn’t cool.
Quickly after I placed the corkboard, and tucked the edges into the frame.
And that was it! I plan on using it to “pin” ideas for inspiration and home makeover ideas. Like a little project board.
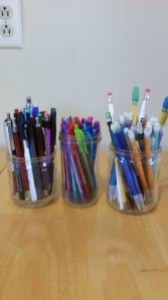
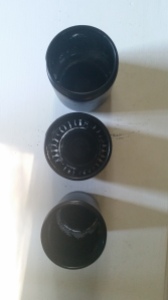
As I mentioned in my Friday Finds post, I collected a bunch of old bottles and was brainstorming some ideas of what I could do with them. I decided to make pencil holders out of a few of the smaller jars that had some cool detail on them. My old pencil jars were tin cans with spray paint and string. It was time for something different.
Below is a picture from my college apartment, and you can see my old pencil holder on the right.
First I put all my pens and pencils in the jars to make sure they would all fit, and the jars were the appropriate heights.
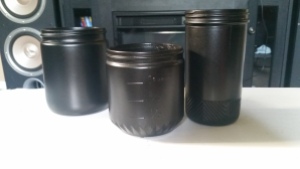
Then I took the jars outside and gave them a couple coats of black metallic spray paint.
I liked how they looked, but I thought they needed something that would bring out the cool details in the jars. (the one on the far left doesn’t have anything special)
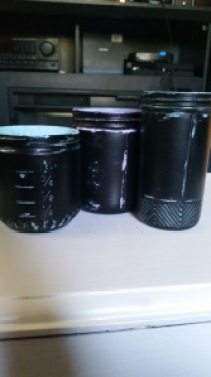
To try to bring out the details more I sanded the ridged areas.
You can tell from the angle above that I sanded the jars, but you can’t see a lot of difference from the outside.
Like basically no difference at all. 🙁
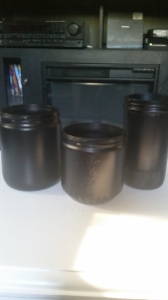
SO, I decided to pull out some of my craft paints and paint the insides of the jars.
I used a craft brush and painted the two jars with aqua and one with lilac. I also painted slightly on the rims too.
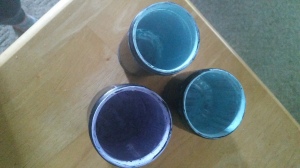
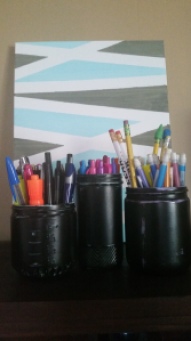
Here is what the jars look like from the top. I didn’t bother making the paint thick because the jars will be filled and from the outside it looks solid.
Here they are all settled on my china cabinet with some DIY canvas art I did a while ago.
What do you think? Do you like the chippy look of the jars?
A while back I added some paint to a dresser, and meanwhile bickered up a storm about the idiot that did such a horrible paint job. Turns out Chris got this dresser from one of his friends, and the truth is he just didn’t care enough about this dresser to take the time to do the job right (sorry not sorry, Mike. It looked like crap).
In phase 1 I added a coat of white paint to the whole thing (minus the wood top) including the insides of the drawers. And we can’t forget about that God awful contact paper I removed. Lastly, I gave the drawer pulls a nice coat of black spray paint.
I also attempted to remove some of the paint from the wood top.
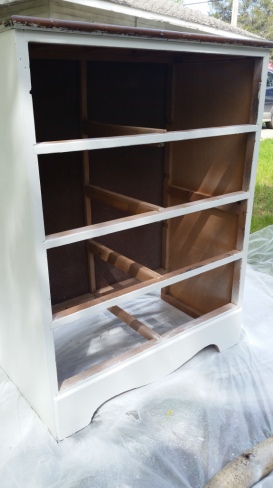
In phase two, this is what I started with.
In this stage, the first thing I did was pull all the drawers out and tape off the top. Then I gave the dresser one last coat of white paint with my Home Right Finish Max HVLP Sprayer.
We didn’t have any newspaper, so I used what we had which is colored construction paper.
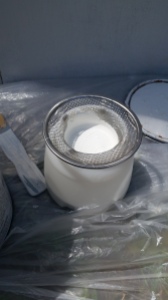
To get everything prepped I made sure to strain my paint since it was leftover from other projects. I bought this sink strainer from Dollar General and it fits perfectly into my sprayer’s container!
Typically paint needs to be thinned to avoid clogging the sprayer. The Home Right Finish Max comes with a viscosity cup, and depending on how quickly the paint runs out that will tell you if it needs to be thinned more. For water based paints it is perfectly okay to thin with water.
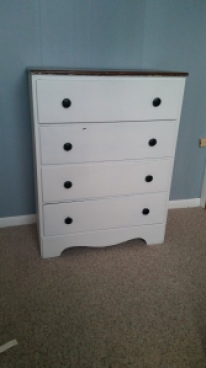
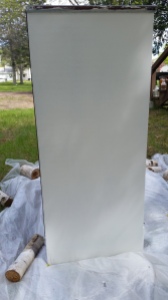
Here’s what she looks like with the fresh coat of white!
I’m not sure what’s up with the left side of the dresser, but the color looks off compared to the right side. In the before pictures it’s also obvious that it was harder to get good coverage. Not sure why, but now the only difference is the color slightly.
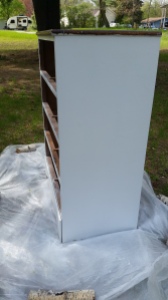
It’s a little hard to see, but in the picture above the wind knocked some dirt into my paint job! I waited until everything dried and just wiped it off with a dry rag. Good as new.
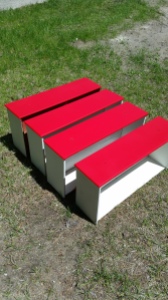
To give this bland dresser some character I painted the drawers with General Finishes Holiday Red Milk Paint. T’s bedroom is (mostly) Avenger themed and I thought this color would go perfectly.
The night before painting these drawers I bought a roll of masking paper and taped the three sides of the drawers I didn’t want painted.
I didn’t tape the bottoms because no one will see the paint on them during general use.
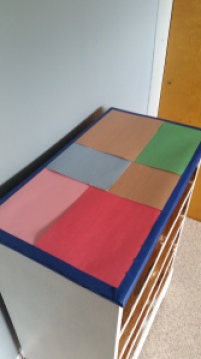
Originally I set the drawers up like the photo below, but when I started spraying nothing came out. The sprayer can be tilted somewhat, but not to this extent.
Instead I used an outdoor table with a drop cloth and set the drawers on top. That worked perfectly, but I should have laid the paper side down. As you can see with the third drawer from the left in the picture above, there is some of the drawer peeping through. This is because the paper wasn’t quite long enough. When I laid the drawers down the paper sunk more and I got overs spray inside the drawers. It will be an easy fix to sand them down a little and go over it with a brush and some white paint, but it could have been avoided.
Here are the drawers with their fresh coat of red. I think the picture on the right gives the most accurate representation of what this color looks like in real life.
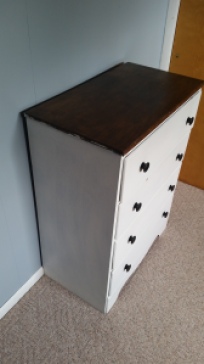
Next I set out to remove more paint from the edges of the wood top. To do this I taped the painted part off and used a cotton ball with rubbing alcohol. Some areas came right off, and others I just had to scrape a little with my fingernail.
You can see there are only tiny little flecks left.
The front had even more paint, and now there’s none!
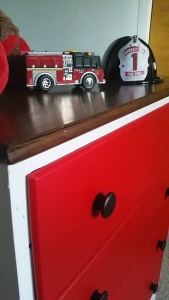
Last but not least this baby got a fresh coat of stain on top with some leftover General Finishes water based stain in Brown Mahogany.
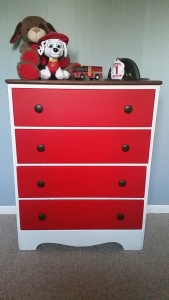
The final product is exactly what I had in mind, and I absolutely love it! Even though his room is (mostly) Avengers themed I had to style the dresser up with some of little T’s firefighter gear. I don’t recall mentioning this on the blog, but Chris is a firefighter 🙂
Even though red is a vibrant color I can think of so many styles this dresser could go along with, even in just a kid’s room.
As a side note, this is not a sponsored post in any way. This is the first project I used my Home Right Finish Max for and it worked like a charm. This is also the first time I used General Finishes Milk Paint, and I love it just as much as their other products I have tried (Gel Stain and Topcoat, and Water Based Stain).
What style would you use this dresser with? As always feel free to leave me a question or comment, I would love to hear what you have to say 🙂
Last Friday I had quite an adventurous day, and I found several cool things throughout. Some I kept, some I didn’t.
My best friend was home from college, and we went to my mom’s house to get my (horse) show clothes for her to borrow. Unfortunately, the tenant that is currently renting my mom’s house said they “may have ended up at goodwill after the garage sale”. That’s hundreds of dollars of clothes down the drain, my friends. And let me tell you… my mom was NOT happy when she found out. Yikes.
On the bright side, I was able to grab a few things I decided I wanted to take home. Some of the things I grabbed included riding boots, sewing machine, coat rack with cubbies, my tennis racket, and a sweet plaid wool blanket that belonged to my mom’s dad.
My mom doesn’t live at the house currently, but we both have plenty of stuff stored away in the garage. I wanted to get the rest of my stuff especially after what happened, but Chris and I just don’t have the space to store anything else. I figure that once we buy a house if it has a garage then I will get the rest of my stuff and possibly some/all of mom’s stuff that’s there. (honestly I don’t think she would notice if someone stole everything of hers out of there). Her address is… just kidding 😉
Speaking of a new house… I found this awesome file folder at the antique store in my hometown. We figured while we were in town we had to stop!
It’s so adorable and I didn’t think it was too pricey. It instantly made me think of that Fixer Upper style. Unfortunately, I currently don’t have an office at home so I don’t have a use for it yet. Now that I think about it, I totally should have just bought it and taken it to work!
Last but not least I scavenged up a bunch of really cool old bottles. While we were at the antique store I saw a bunch of old glass medicine bottles and mentioned how my mom used to find those in her back yard all the time. My friend says they have a spot on the side of their road where people used to dump stuff and there are a TON of bottles. I like to call it the bottle graveyard.
Here are most of them after I packed them into the car. There are plenty more that were intact and easy to find, but I had to put them back because I don’t even know what I’m going to do with all of these!
Here they are lined up on the back steps after the initial rinse. I didn’t get to the bottles with lids because I want to put gloves on so I don’t cut myself.
Filled them up with a dab of soap and a bunch of water
I didn’t clean them all out yet. I need to get better scrub brushes that will fit into the bottles instead of a dishcloth.
These bottles are so unique, but I still can’t decide what I want to do with all of them!