This is honestly one of those projects that took a turn because I got lazy. My roommate broke my full-size mirror a long time ago and I tried to come up with a way to reuse the broken glass. I decided on making a mosaic and searched a while for just the right frame. Then I found this:
It was perfect for my original project because it was a sturdy frame with a solid backing to lay glass on. The first thing I did was sand it down a little and give it a coat of black spray paint.
I started laying the glass pieces (without glue), but this is as far as I got before giving up (or at least I told myself I would finish it later).
It looked pretty cool, but it got harder to arrange the glass pieces without much space in between. I also decided when I was finished it was going to be really heavy.
Instead I had Chris dump all the glass for me and I pulled out some leftover cork and fabric. I decided to make a corkboard for the office I keep dreaming about.
To begin I laid out the cork and measured the dimensions of the inside of the frame. I measured it out on the cork and drew the lines where I needed to cut.
After cutting I put the cork in the frame to check it was right before cutting the fabric.
To cut the fabric I placed the cork on top and cut it leaving a little bit extra to fold over the edges of the cork.
My fabric was a little wrinkly, and we have very limited resources to fix that. Iron? Nope. Dryer? Nope. DIY de-wrinkle spray made with fabric softener? Definitely nope. Instead, I tried the next closest thing to the dryer trick. Which was hanging my cut piece of fabric on the towel bar in the bathroom while I showered. Took the wrinkles right out! 🙂
To glue it together I used mod podge on the face of the cork and used my hot glue gun to glue the edges of the fabric to the back of the cork.
Then, to glue the cork to the frame I put hot glue all along the edges and an X through the middle. I had to do it quickly so the glue wouldn’t cool.
Quickly after I placed the corkboard, and tucked the edges into the frame.
And that was it! I plan on using it to “pin” ideas for inspiration and home makeover ideas. Like a little project board.
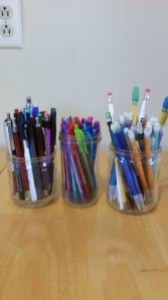
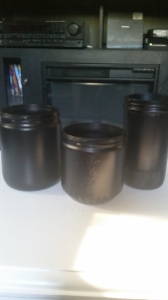
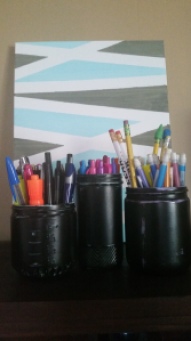
As I mentioned in my Friday Finds post, I collected a bunch of old bottles and was brainstorming some ideas of what I could do with them. I decided to make pencil holders out of a few of the smaller jars that had some cool detail on them. My old pencil jars were tin cans with spray paint and string. It was time for something different.
Below is a picture from my college apartment, and you can see my old pencil holder on the right.
First I put all my pens and pencils in the jars to make sure they would all fit, and the jars were the appropriate heights.
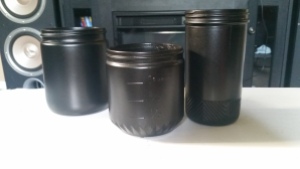
Then I took the jars outside and gave them a couple coats of black metallic spray paint.
I liked how they looked, but I thought they needed something that would bring out the cool details in the jars. (the one on the far left doesn’t have anything special)
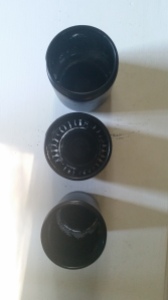
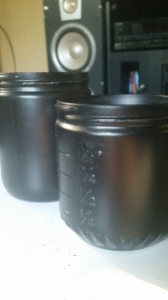
To try to bring out the details more I sanded the ridged areas.
You can tell from the angle above that I sanded the jars, but you can’t see a lot of difference from the outside.
Like basically no difference at all. 🙁
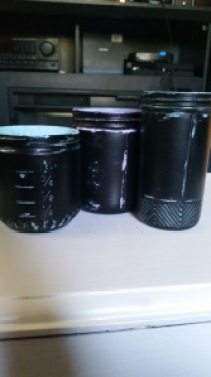
SO, I decided to pull out some of my craft paints and paint the insides of the jars.
I used a craft brush and painted the two jars with aqua and one with lilac. I also painted slightly on the rims too.
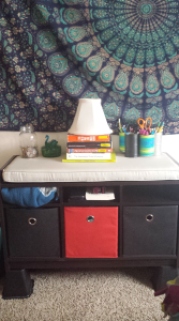
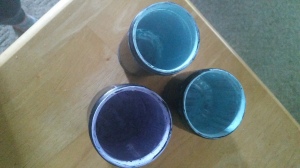
Here is what the jars look like from the top. I didn’t bother making the paint thick because the jars will be filled and from the outside it looks solid.
Here they are all settled on my china cabinet with some DIY canvas art I did a while ago.
What do you think? Do you like the chippy look of the jars?
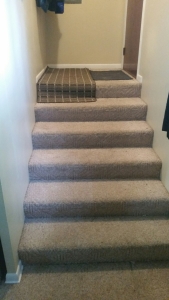
About a month ago I texted my landlord about ripping up the carpet on the entry stairs and replacing it with some vinyl. It took her about a week to respond, so I figured the answer would be no as it usually is.
Quite the contrary, she texted back and said sure! That surprised me. Having permission to sporadically change things in the house is very exciting.
I started ripping the carpet up within half an hour of getting her text.
Here’s what we started with. The big rug is usually in the kitchen, but it’s been up there a while because spring tracks a lot of mud in, and it’s annoying having to vacuum the landing all the time.
We also track in a lot of pine needles which hurt like a SOB to step on when they’re stuck in the carpet.
Since I had permission from the landlord and was raring to go, I didn’t bother telling Chris before I started destroying the carpet. I was so sick of it and wasn’t going to wait any longer.
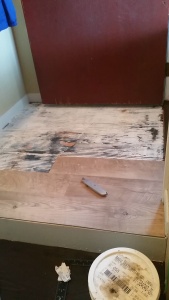
The first thing I found was the landing is made of plywood and covered in that black stuff. I think the black stuff is some sort of non-slip sand adhesive. Then I kept pulling up the carpet and got this piece of joy.
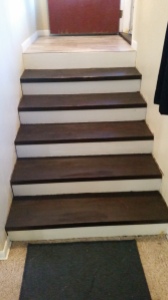
Nice pine steps and risers! Yay.
After ripping the carpet and padding off I pulled out all the tack strips and staples from the stairs. I didn’t pull all the staples from the landing because I’m going to cover it with vinyl, and the stairs will be painted and stained with General Finishes Java Gel. Instead, I pulled all the padding out of the staples and hammered them down.
One issue that I ran into with the tack strips is that I don’t own a crowbar. Instead, I just used a hammer and flathead screwdriver. Just wedge the screwdriver under the strip where the nail is and use the hammer to wiggle it under further. Then use the leverage and pull up on the strip (by pushing down on the screwdriver). It’s kind of a pain in the butt on some of them, but it works.
After getting all the staples off the steps they were ready to be sanded in preparation for stain. The picture below is before sanding.
I took my Ridgid random orbital sander to the steps with an 80 grit sanding pad. Since I have an orbital sander (which is round) I couldn’t get all the way to the edges of the stairs very well which left some paint. I went back by hand to try to get as much off as I could, but it wasn’t very efficient.
The picture below is after sanding. It’s a little hard to compare because of the opposite angles, but they’re a lot cleaner with fewer paint splatters.
Next, I cleaned the steps off with a shop towel and some mineral spirits. Then I applied mineral spirits to each step right before I stained. General finishes recommends this to help the stain go on smoothly.
Make sure to apply stain to every other step so that the stairs are still usable while the stain dries (6-8 hours).
And then here’s a picture of them all stained.
After the stain dried, I taped the stairs off to paint the risers.
I also used paper so I wouldn’t get paint on the steps. As you can see in the picture, I didn’t tape off the risers when I stained. I figured it would be easy to paint over. It seemed that it actually was easier to cover the paint with gel stain than the other way around.
Before priming I sanded the risers by hand with 80 grit sandpaper.
After the first coat of primer I went back and filled in the holes with spackle. Then I sanded lightly and did another coat. I like to wait until I prime to fill in the holes because it makes them a lot more visible.
After two coats of primer I applied two coats of paint.
I also sanded and repainted the trim by the landing to make sure it looks crisp before installing the vinyl
I’ve repainted this trim probably twice already, but it gets dingy pretty quickly and the new floor will be lower than the carpet.
Before putting in the new vinyl I also wanted to stain the threshold of the front door to match the steps.
Since the stairs are going to be a different color than the vinyl on the landing, I wanted to make sure the entry looks as cohesive as possible.
And of course, since stairs are high traffic I added a coat of General Finishes Gel Topcoat.
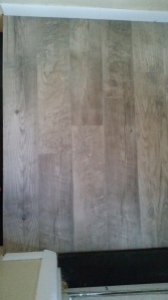
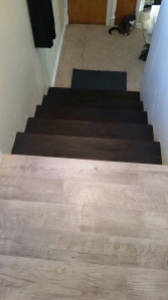
And after several days of putting it off, we finally got around to laying the vinyl on the landing! It’s really easy to do, and I was going to attempt doing it myself. Chris wanted me to wait until he would be around to help me though, which honestly was a good idea. Laying the floor and cutting the boards isn’t too bad when it’s just straight cuts, but having to work around the trim pieces was really frustrating for me. I explain in this post how we laid the floor in our bathroom, and what exactly we used if you’re interested 😀
Chris did up until this point on the landing, and I got to do the rest until the trim on the other side of the door. I didn’t get to do much cutting when we did the bathroom floor, so I’m glad I got to try it out.
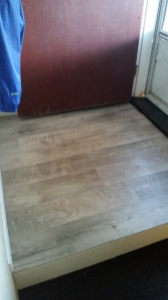
I am so obsessed with how this project turned out. The entry is so much brighter and spacious now that the carpet is gone. And it’s going to be way easier to keep it clean. No more lugging the vacuum all the way up the steps!
If you like this post let me know, and feel free to pass it along!
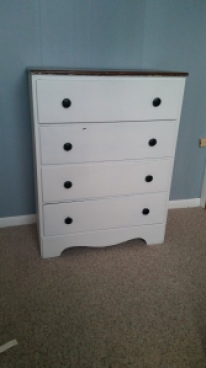
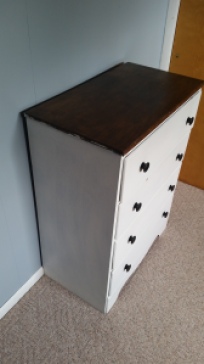
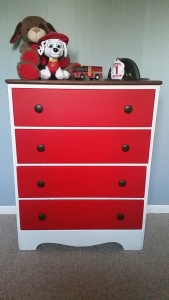
A while back I added some paint to a dresser, and meanwhile bickered up a storm about the idiot that did such a horrible paint job. Turns out Chris got this dresser from one of his friends, and the truth is he just didn’t care enough about this dresser to take the time to do the job right (sorry not sorry, Mike. It looked like crap).
In phase 1 I added a coat of white paint to the whole thing (minus the wood top) including the insides of the drawers. And we can’t forget about that God awful contact paper I removed. Lastly, I gave the drawer pulls a nice coat of black spray paint.
I also attempted to remove some of the paint from the wood top.
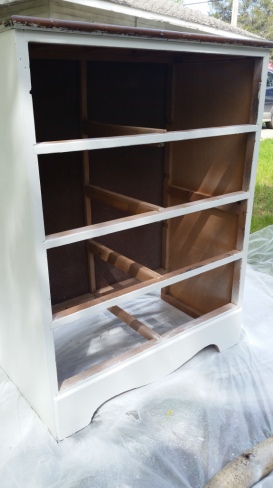
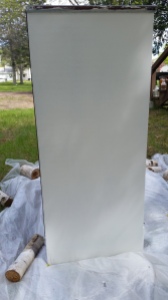
In phase two, this is what I started with.
In this stage, the first thing I did was pull all the drawers out and tape off the top. Then I gave the dresser one last coat of white paint with my Home Right Finish Max HVLP Sprayer.
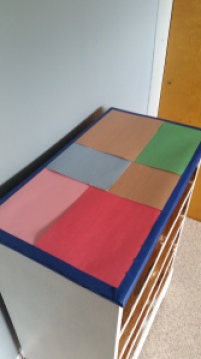
We didn’t have any newspaper, so I used what we had which is colored construction paper.
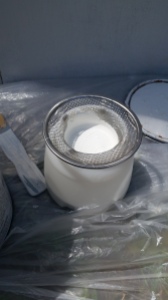
To get everything prepped I made sure to strain my paint since it was leftover from other projects. I bought this sink strainer from Dollar General and it fits perfectly into my sprayer’s container!
Typically paint needs to be thinned to avoid clogging the sprayer. The Home Right Finish Max comes with a viscosity cup, and depending on how quickly the paint runs out that will tell you if it needs to be thinned more. For water based paints it is perfectly okay to thin with water.
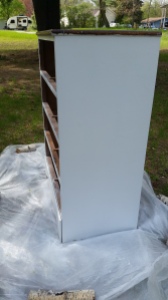
Here’s what she looks like with the fresh coat of white!
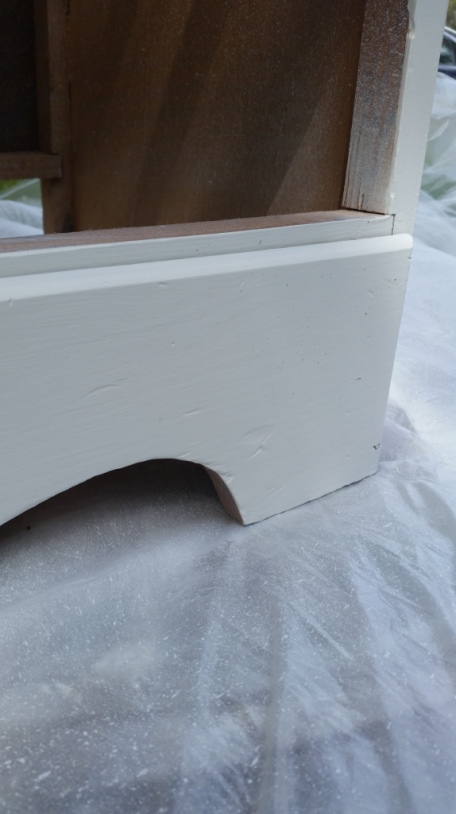
I’m not sure what’s up with the left side of the dresser, but the color looks off compared to the right side. In the before pictures it’s also obvious that it was harder to get good coverage. Not sure why, but now the only difference is the color slightly.
It’s a little hard to see, but in the picture above the wind knocked some dirt into my paint job! I waited until everything dried and just wiped it off with a dry rag. Good as new.
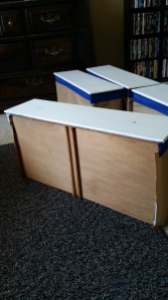
To give this bland dresser some character I painted the drawers with General Finishes Holiday Red Milk Paint. T’s bedroom is (mostly) Avenger themed and I thought this color would go perfectly.
The night before painting these drawers I bought a roll of masking paper and taped the three sides of the drawers I didn’t want painted.
I didn’t tape the bottoms because no one will see the paint on them during general use.
Originally I set the drawers up like the photo below, but when I started spraying nothing came out. The sprayer can be tilted somewhat, but not to this extent.
Instead I used an outdoor table with a drop cloth and set the drawers on top. That worked perfectly, but I should have laid the paper side down. As you can see with the third drawer from the left in the picture above, there is some of the drawer peeping through. This is because the paper wasn’t quite long enough. When I laid the drawers down the paper sunk more and I got overs spray inside the drawers. It will be an easy fix to sand them down a little and go over it with a brush and some white paint, but it could have been avoided.
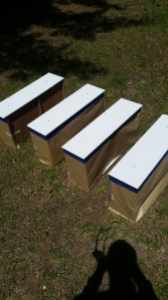
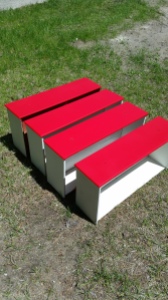
Here are the drawers with their fresh coat of red. I think the picture on the right gives the most accurate representation of what this color looks like in real life.
Next I set out to remove more paint from the edges of the wood top. To do this I taped the painted part off and used a cotton ball with rubbing alcohol. Some areas came right off, and others I just had to scrape a little with my fingernail.
You can see there are only tiny little flecks left.
The front had even more paint, and now there’s none!
Last but not least this baby got a fresh coat of stain on top with some leftover General Finishes water based stain in Brown Mahogany.
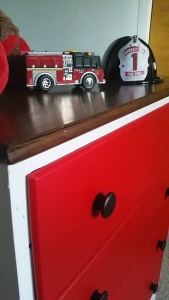
The final product is exactly what I had in mind, and I absolutely love it! Even though his room is (mostly) Avengers themed I had to style the dresser up with some of little T’s firefighter gear. I don’t recall mentioning this on the blog, but Chris is a firefighter 🙂
Even though red is a vibrant color I can think of so many styles this dresser could go along with, even in just a kid’s room.
As a side note, this is not a sponsored post in any way. This is the first project I used my Home Right Finish Max for and it worked like a charm. This is also the first time I used General Finishes Milk Paint, and I love it just as much as their other products I have tried (Gel Stain and Topcoat, and Water Based Stain).
What style would you use this dresser with? As always feel free to leave me a question or comment, I would love to hear what you have to say 🙂
Last Friday I had quite an adventurous day, and I found several cool things throughout. Some I kept, some I didn’t.
My best friend was home from college, and we went to my mom’s house to get my (horse) show clothes for her to borrow. Unfortunately, the tenant that is currently renting my mom’s house said they “may have ended up at goodwill after the garage sale”. That’s hundreds of dollars of clothes down the drain, my friends. And let me tell you… my mom was NOT happy when she found out. Yikes.
On the bright side, I was able to grab a few things I decided I wanted to take home. Some of the things I grabbed included riding boots, sewing machine, coat rack with cubbies, my tennis racket, and a sweet plaid wool blanket that belonged to my mom’s dad.
My mom doesn’t live at the house currently, but we both have plenty of stuff stored away in the garage. I wanted to get the rest of my stuff especially after what happened, but Chris and I just don’t have the space to store anything else. I figure that once we buy a house if it has a garage then I will get the rest of my stuff and possibly some/all of mom’s stuff that’s there. (honestly I don’t think she would notice if someone stole everything of hers out of there). Her address is… just kidding 😉
Speaking of a new house… I found this awesome file folder at the antique store in my hometown. We figured while we were in town we had to stop!
It’s so adorable and I didn’t think it was too pricey. It instantly made me think of that Fixer Upper style. Unfortunately, I currently don’t have an office at home so I don’t have a use for it yet. Now that I think about it, I totally should have just bought it and taken it to work!
Last but not least I scavenged up a bunch of really cool old bottles. While we were at the antique store I saw a bunch of old glass medicine bottles and mentioned how my mom used to find those in her back yard all the time. My friend says they have a spot on the side of their road where people used to dump stuff and there are a TON of bottles. I like to call it the bottle graveyard.
Here are most of them after I packed them into the car. There are plenty more that were intact and easy to find, but I had to put them back because I don’t even know what I’m going to do with all of these!
Here they are lined up on the back steps after the initial rinse. I didn’t get to the bottles with lids because I want to put gloves on so I don’t cut myself.
Filled them up with a dab of soap and a bunch of water
I didn’t clean them all out yet. I need to get better scrub brushes that will fit into the bottles instead of a dishcloth.
These bottles are so unique, but I still can’t decide what I want to do with all of them!
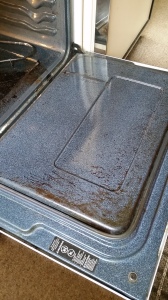
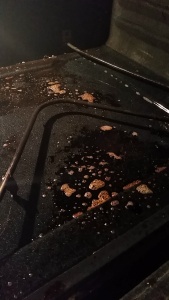
Over spring break I finally got around to cleaning our disgusting oven. It was disgusting when we inherited it, but I would be lying if I said we didn’t contribute to the mess. Thank goodness for spring cleaning to get me motivated to fix it.
This is the horror I started with
I don’t understand how an oven gets to look like a murder scene, but this one sure does
I’m honestly kind of embarrassed by the fact that this oven has been this gross for so long. And by the fact that I actually cooked food in here.
Natural Method
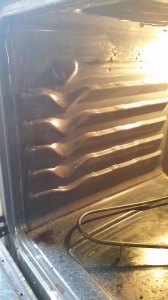
To start I sprinkled baking soda over everything and tried my best to get it on the sides.
I read on Pinterest that simply letting baking soda and vinegar sit for a while then scrubbing works pretty great, so that’s what I did. I already use baking soda and vinegar for cleaning several other things in the house, so I had confidence it would clean the oven.
I used a spray bottle to spritz the vinegar in the oven. Even though it’s completely natural, be careful not to breathe in the vinegar fumes/spray. Acid in your lungs is never a good idea.
Before getting my sponge out I literally got a spatula to scrape out the gunk. Disgusting.
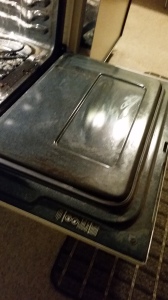
This is what the door looked like after the baking soda and vinegar method. Still gross, but it got the majority of the mess off. The sides of the oven also look WAY better.
Chemical Method
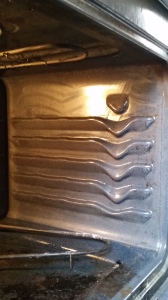
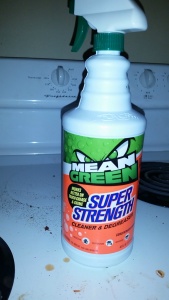
The bottom of the oven was still pretty nasty though, and I wanted to see if the rest of the oven could get quite a bit cleaner with only minimal effort, so I broke out the big guns. Mean Green Super Strength Cleaner & Degreaser. I’ve used this to degrease my cabinets, and it works pretty great.
I sprayed it on the entire oven and let it sit for a couple of hours. It dried out by the time I got back to it, so I sprayed it on again before scrubbing with the sponge.
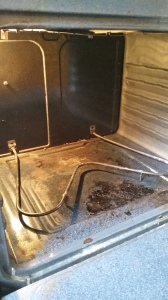
The oven looks way better than it did to start with, and I’m more at ease about cooking food in here now.
I’ll probably go back over it again when I’m out of school, and have more time.
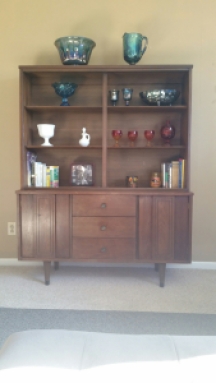
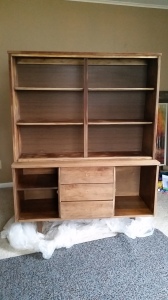
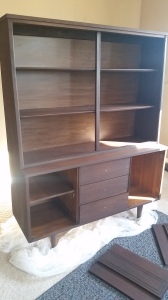
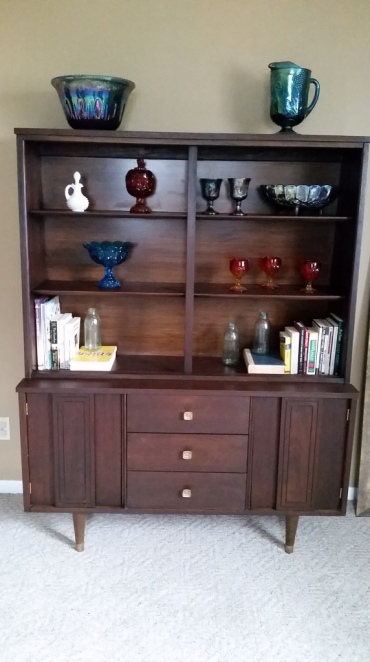
Wow, I can’t believe it has been over two weeks since I posted last! Whoops. But I’ll make it up to you this week by showing you my finished china cabinet! A few months ago (4 months to be exact) I shared my ideas for updating the cabinet and asked your opinions on what I should choose. I ended up choosing to stain the piece in General Finishes Java Gel Stain. Many of the pieces I saw were extremely dark, but I did see one that was lighter and I absolutely loved it. I figured I would only do one coat and that would be light enough and let the red tone of the wood show through.
To do this project I purchased:
GF Java Gel Stain (1 qt): $26.67
GF Gel Topcoat in Satin (1 qt): $26.67
Shop Towels: 3 rolls for $5.98
Mineral Spirits: $4
Foam Brush: $2?
I already had on hand:
Plastic drop cloth
Rub N Buff Antique Gold
Gloves
One foam brush
Ridgid random orbital sander
80 and 220 grit sandpaper
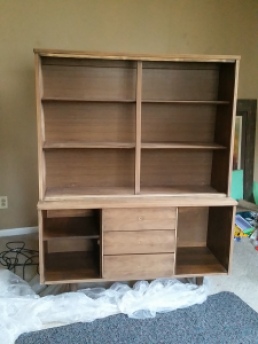
Here is what I started with:
If you want to see more in depth pictures, there are some in the post I linked to above.
I cleaned the drawer pulls by soaking them in baking soda and vinegar then scrubbing with an SOS pad.
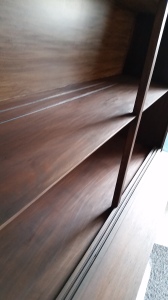
Next, I sanded the crap out of the whole thing (minus inside the cabinets and the faux wood backing). I used my Ridgid random orbital sander with an 80 grit sanding pad. I wanted to sand down to the bare wood in order to keep the piece from getting too dark. Another reason was due to scratches on the cabinet doors and shelves, along with some nasty water rings on the top. I didn’t want to have to fill the scratches in with wood filler.
After I sanded everything with 80 grit I hand sanded with 220 grit to smooth it back out. General Finishes has great videos that I would recommend watching if you are going to use their products. I watched this video on how to apply Gel Stain and topcoat. It also explained not to go any farther than a certain grit or the pores of the wood will be closed and won’t accept the color as well.
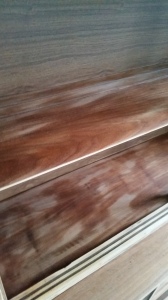
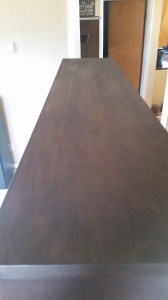
After sanding I wiped the entire piece down with Mineral Spirits to clean the dust off and prep the wood. For water based stains use a mixture of water and denatured alcohol.
You can see in the pictures above how the mineral spirits bring out the red color in the wood. It dries pretty fast so it was hard to get a good picture.
General Finishes also recommends wiping down the surface with mineral spirits right before applying the stain. This helps the stain glide across the wood since it is so thick.
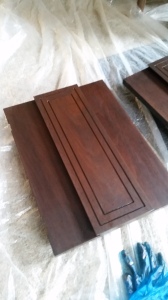
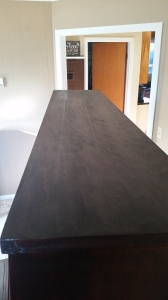
I then used a foam brush to dapple the stain onto the cabinet. Then I used a rag to spread the finish out evenly and wipe any excess off. Work in small sections so the product doesn’t dry out before you get a chance to wipe off the excess.
Here are some pictures once I got the stain on:
I let the stain dry for a full day before applying the gel top coat. To apply the topcoat I got a new foam brush and brushed on the product in a very thin layer. I went quickly at first to get it on the surface then went back slowly to make sure the lines were even.
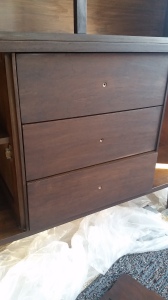
You can see in the pictures above how much richer the color is, and how the wood grain stands out after applying the topcoat. (The left picture is without topcoat).
General Finishes recommends putting more than one coat of topcoat on and sanding with a fine grit in between coats. This is because the first coat of topcoat is likely to lift the stain and create a grainy look. I didn’t have this problem so I just stuck with one coat. I also didn’t want to have to do any more sanding.
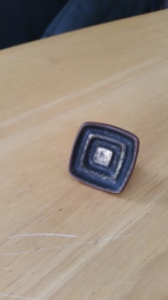
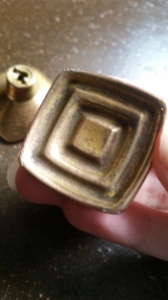
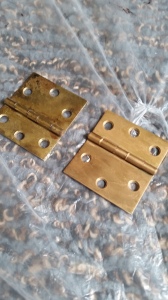
As I mentioned before, I cleaned the drawer pulls and did not use Rub n Buff on them. However, I couldn’t get the door hinges as clean as I wanted so I decided to use Rub N Buff on them.
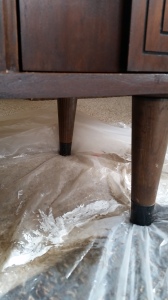
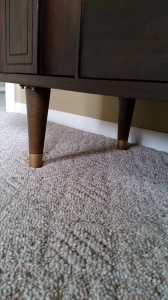
This china cabinet also whispered to me how much it would love having little gold feet. Sooo I used some Rub N Buff on the black part on the legs.
Great thinking, cabinet! I love your little gold feet.
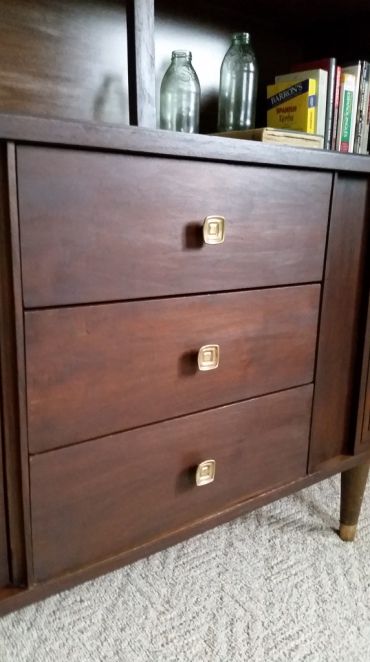
Here are the after pictures!
I love how much depth this stain has to it. It’s so rich looking, and it was very simple to use. I was shocked by the price of the stain when I bought it, but I hardly made a dent in the can. A little bit goes a long way, which I noticed even with the water based stain I’ve used on two other projects. And for an oil based stain, it didn’t have too much smell to it. I did have the windows open, though.
I was not compensated by General Finishes in any way for writing this post, and all of the opinions are my own. However, they did follow me on Instagram. score!
So what do you think? Did I make a good color choice? Would you say this is a proper restoration?
Eventually I think I would like to sell this baby, but for now I’m just going to enjoy the product of my hard work.
I contacted my landlord with questions about the house which means I am one step closer to buying it. With all of the questions I asked her I should be able to run the numbers, make an offer, and work out a deal. Considering I can’t know how much longer we have until it’s time to get renters I compiled a punch list of things left to do.
In order to have the lower unit rent ready, these are the things that I must have completed
Remove the door in T’s bedroom
Paint the last wall in T’s bedroom
Paint the trim in T’s bedroom
These first three tasks are the leftovers from when I painted the paneling in this room and the fact that the trim is in desperate need of a fresh coat
Check that the heater is clean and running smoothly
Check the smoke detector
Fix the run in the carpet
Install a fan in the bathroom
Fix the overhead light in the bathroom
Clean everything
On the other hand, there are also things I would like to have done before we get tenants. Time and money permitting
Replace carpet with new carpet in bedrooms/living room
Replace carpet with laminate in kitchen/dining area
I’m thinking of going with a laminate similar to this (maybe even this one), and a beige brown carpet
Stain stair treads, paint the risers.
These last three wants all have to do with flooring. The only spot in our unit that doesn’t have carpet is the bathroom. Even in the places that it makes sense to have carpet, the carpet isn’t so great even after a good cleaning. Mostly the idea with replacing the flooring is we would likely get a better deal if we bought the same flooring for upstairs and downstairs all at once. One of the first things I would like to do once (if) we get the house is replace all the flooring upstairs even before moving in.
I’m planning on knocking out some of the items on the must-do list over my spring break (in one week). It’s probably a good thing that we just got bombarded with snow here in Michigan, otherwise I might be tempted to do some yard work.
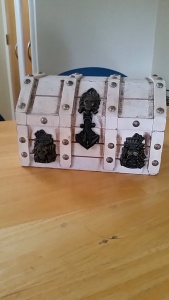
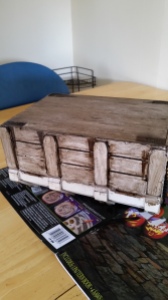
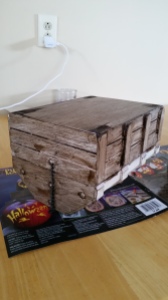
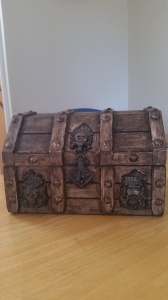
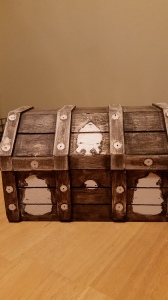
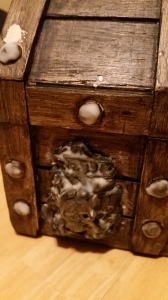
A while back I mentioned a treasure chest looking box I was restoring for a friend. I finally finished it and he was so happy with the way it turned out.
My advice to you is to avoid minuscule details AT ALL COSTS. Does this mean I’m suggesting you shouldn’t do projects with small details? YES. Are you going to want to do one anyway? Probably. In those instances where you (and I) are crazy enough to take on such a stupid thing, work smarter and minimize your frustrations.
At first I tried to work around the hardware because I thought I wouldn’t be able to get it off. Then I got really frustrated and realized maybe I should at least try taking it off. My life became SO much easier.
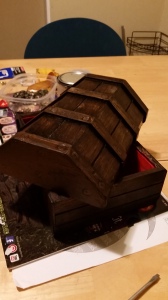
But anyway, here are some before pictures
A lot of people told me that they thought it looked okay beforehand. However, up close the stained areas look pretty whack and careless. The hardware definitely needed to be cleaned too.
Also, notice how the left hinge is missing and part of the felt in the box is messed up
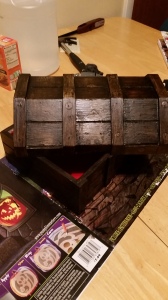
The first thing I did was sand the box down really well. I didn’t bother going down to the wood because I figured the General Finishes stain would cover it up. This is what the box looked like after the first coat
Then after the second coat
I used a rag and tried to work around the hardware but I couldn’t get the stain to even out. At first I used q-tips to get the cracks (which I’ll admit was pretty resourceful), but it wasn’t getting the results I was looking for.
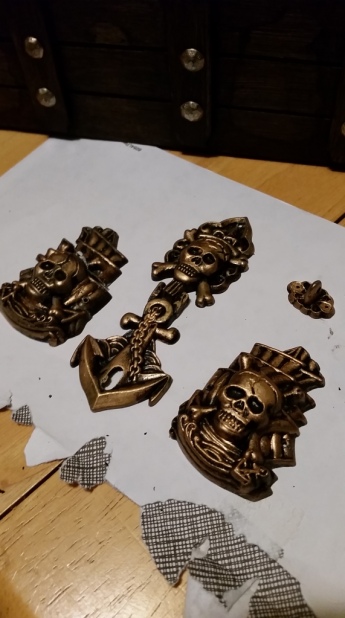
So then I said screw it and grabbed a screwdriver (no pun intended) and pried all the itty bitty nails off.
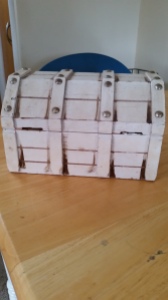
This is what the box looked like after I got all the hardware off and sanded it down some more.
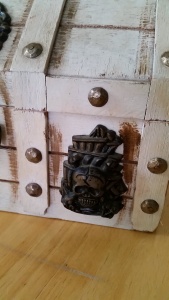
Before I took everything off I tried to clean the hardware with a baking soda and vinegar paste. Needless to say that was a pain in the ass. But I found it hilarious that I was brushing the skeletons teeth :p
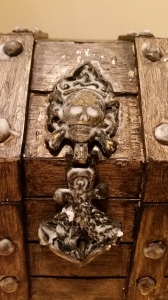
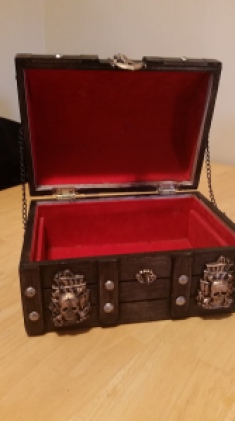
Once I took the hardware off I tried to soak everything in a baking soda and vinegar mixture then scrub the dinginess off. It wasn’t really achieving the look I wanted so I pulled out the Rub-N-Buff in antique gold. It looks soooo much better and still has some of the black showing through.
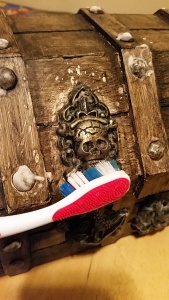
Once I got the hardware off I also got foam brushes to make the stain look even and get in the cracks.
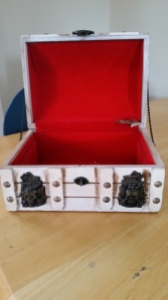
I bought new hinges since one was missing and cut away the velvety liner along the two separate pieces to make it look cleaner.
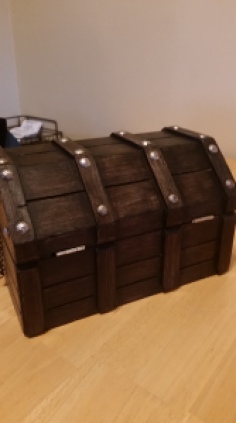
Here is the box after I put it all back together.
This actually turned out to be a fun little project and I made some money on it which made it even better. Again I don’t recommend torturing yourself with tiny little detailed projects, but I GUESS it might turn out okay.
This summer hopefully I’ll be able to flip some furniture as well as doing furniture for friends and family on a larger scale than this box.
If you liked this post I would appreciate it if you would be so kind to pass it along.
I’m moving quite slowly on progress with the house, so this weekend I finally painted little T’s bedroom!
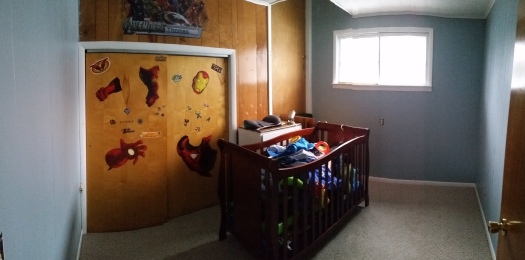
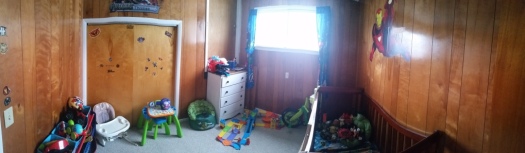
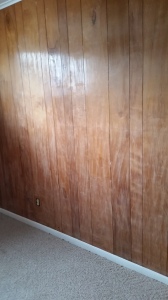
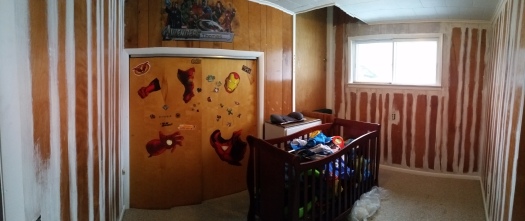
Here is the panorama of this crazy room before its kick ass makeover. Hello again weird door midway up the wall. Glad you decided to make another appearance on the blog.
The post title suggests there is literally no more paneling in my house, but I mean the paneling is painted. Then again that’s not entirely true because I’m not going to paint the closet wall until we take out the weird door and drywall it. When that happens I’ll fill in the cracks in the paneling on just that wall so it doesn’t look super mish moshy. But anyway, PROGRESS. and that is why we are gathered here today.
First I filled the crib up with toys, shoved it to the middle of the room, took stuff out of the room, put things in the closet, and decapitated the iron man sticker.
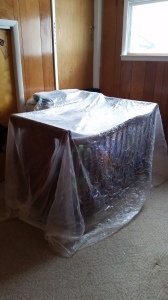
To prep I filled in all the holes with spackle, covered the stuff left in the room with a plastic drop cloth, and took off all the outlet covers. I then went through and sanded all the walls with 220 grit sandpaper. I was going to use my new electric sander, but I figured that would be a bit excessive for just needing to scuff the walls up a bit.
Please please do not skip the sanding step. When Chris and I painted our bedroom paneling we didn’t sand and it was a big mistake. If we nick the walls the paint scrapes right off and you can see the paneling. At the very least rough the surface up a bit even if you don’t sand the crap out of it.
Before I started painting I wiped all the sanding dust off the walls along with any cobwebs in the corners. I also vacuumed the carpet and along the trim to make sure no dust would get into my paint.
When I was cutting in I got all of the cracks because a roller doesn’t do a very good job of that. At this point I also filled in any more holes that I didn’t notice the first time around.
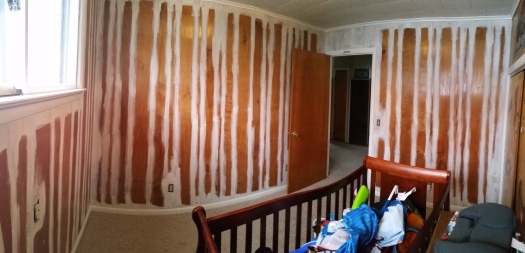
After priming I saw areas where either the paneling color was showing through or it was discoloration from nicotine. In the end I decided to do one coat since that is what we did in the bedroom, and that paneling was even darker.
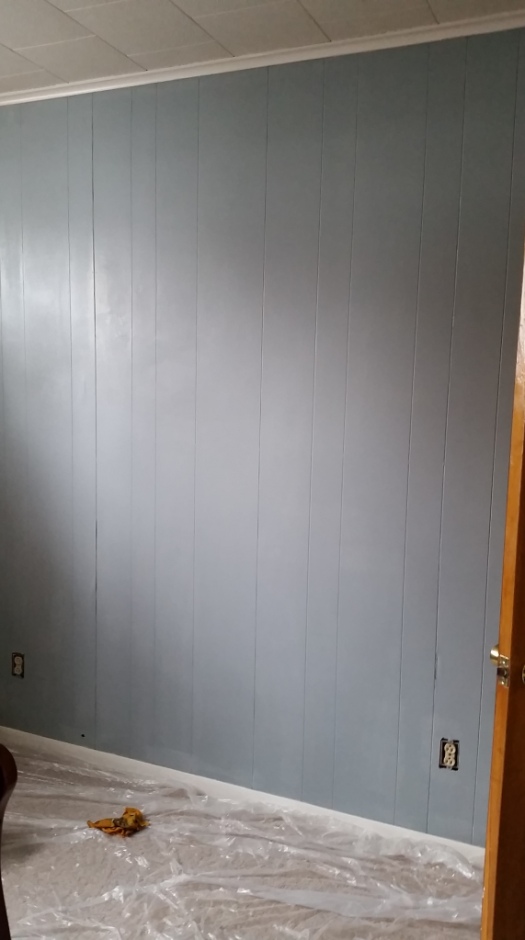
Even when I cut in with the paint I filled in all the cracks. When I started brushing on the paint I remembered how much I love this color. It’s called winter sky gray. It seems rather blue to me though which was a surprise when we first painted our bedroom. I guess it makes sense though since skys are usually blue to some extent.
Slightly above the electrical outlet near the door you will notice some flaws in the gaps. These parts were pulling away from the wall which obviously wouldn’t look good when painted. Chris’s genius solution was to staple gun them down, and it actually worked like a gem.
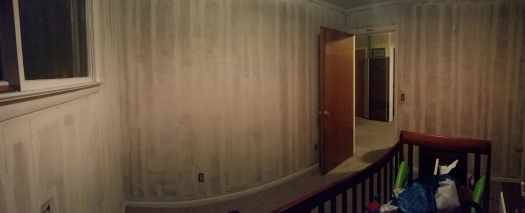
I love this picture because even though I haven’t repainted the trim you can see the crisp difference between the bluish gray wall and the white trim. Just beautiful. (excuse the splotches, the wall wasn’t done drying yet).
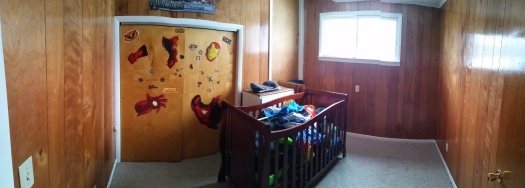
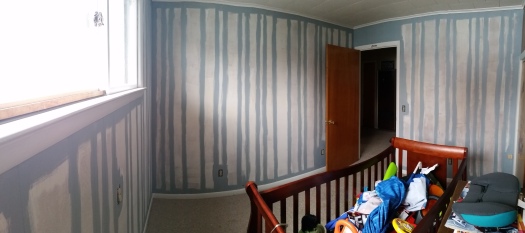
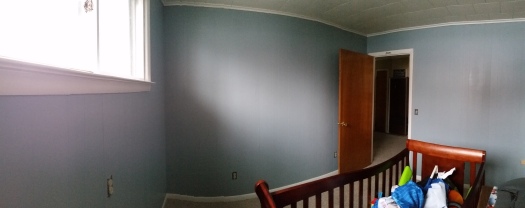
Final product with the “accent wall”. still hadn’t put the room back together yet. I love how much the painted room draws attention to the window. It’s a reminder of how much brighter the room is.
Also notice how high the top of the door goes, and that the area up there is painted. I was using a chair to paint, but couldn’t reach high enough so I asked Chris if he could reach. He just decided to open up the door and stand on the stairs landing. It’s a good thing we’re close friends with the upstairs neighbors and we keep that door unlocked. (it is set up though so both sides can be locked and not one unit has control over the door). Either way it needs to go. Sayonara door!!
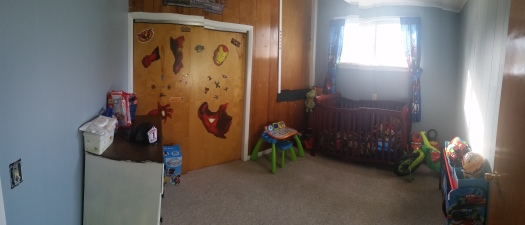
Another view and a way for me to imagine that there is absolutely no more paneling. 😀 I’m in love.
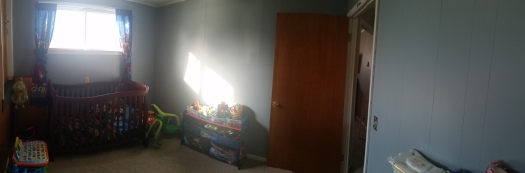
And of course some views of the room put back together/rearranged (minus the still decapitated Iron Man)
Before painting my paneling I also got some really useful information in this blog post about what to use on different types of paneling, and some tools that make it a lot easier.
Chris and I worked on this project for about a day and a half. My body was definitely sore from constantly kneeling, standing, and getting up on a chair. Maybe I’m just weak but that stuff is taxing!
I’m glad to have this project done as it’s really going to propel me into finishing my other projects and working on my time management.
What are your motivating factors?
If you want to see how I finished the white dresser, check out this post.